
How to Downgrade from Windows 11 to Windows 10?
Recently Windows 11 was released for the users. And despite all the new features that include support Android application support, still it is not an OS for everyone. Reasons can vary, while some hated the navigation some had other reasons. No matter what the reasons are, here you are going to downgrade from Windows 11 to 10.
Table of Contents
Downgrade from Windows 11 to Windows 10

We have upgraded our Windows 10 to Windows 11, and now we want to go back. Before we continue, there will be two things that you need to take care of.
The tasks will be used to make things even clear and the process easier. You are going to create a backup of your files and then you will check for the upgrading date of your Windows 11. If your Windows 11 has not completed 10 days of installations then you are going to use the first method, else you will use the second one.
There is a new feature in Windows 11 that keep the old windows system files for 10 days. Within those 10 days, you can downgrade without any Windows 10 setup file. However; after the 10 days, you are going to need the setup file of Windows 10 for installation, as the old Windows system files will be removed automatically from your system.
Backup your Windows
Again, before we continue the procedure, make sure you have created a backup file of your Windows OS. Also, make sure that you have moved all the files from your disk (with Windows system files) to somewhere safe.
Even though, if you won’t format your disk, all the files will be saved. Still, we would recommend you create a backup before we continue the procedure. If you are interested, we have created a full Windows 10 image backup here.
1: Downgrade Windows 11 to Windows 10 within 10 days
For users who have installed Windows 11 on their system for more than 10 days, they will need to use other methods below. As we mentioned downgrading to Windows 10 within 10 days of the installation, the process is easier thanks to new features.
For downgrading, you are going to open Settings on your Windows 11.
Then you will navigate through System > Recovery.
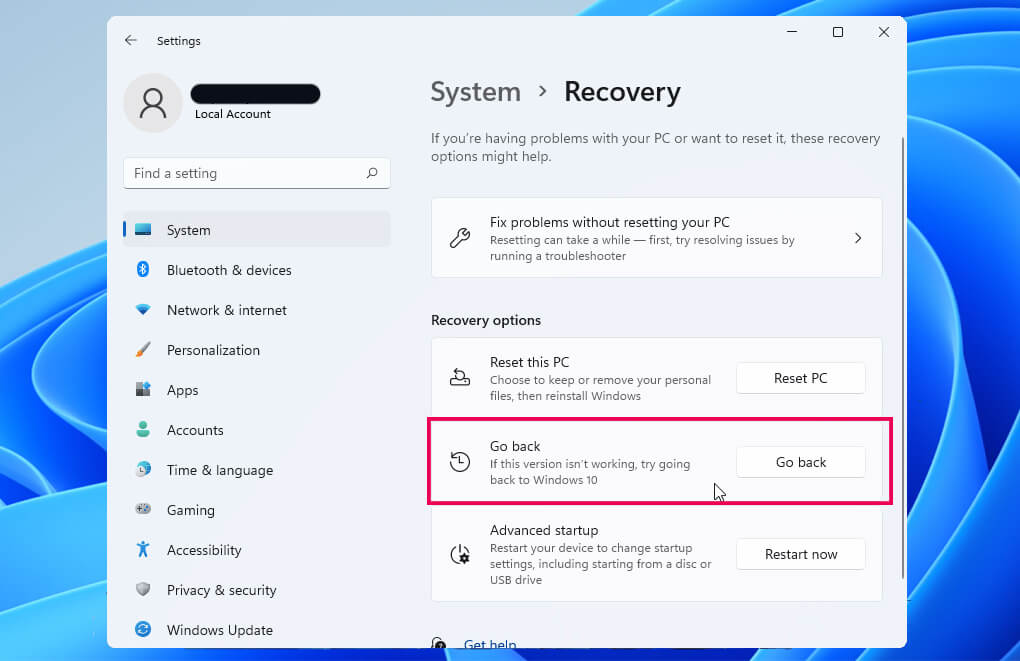
Once you have selected Recovery, then you will be moved to Recovery options. Here you will click on the Go Back button which is in the Previous version of Windows section.
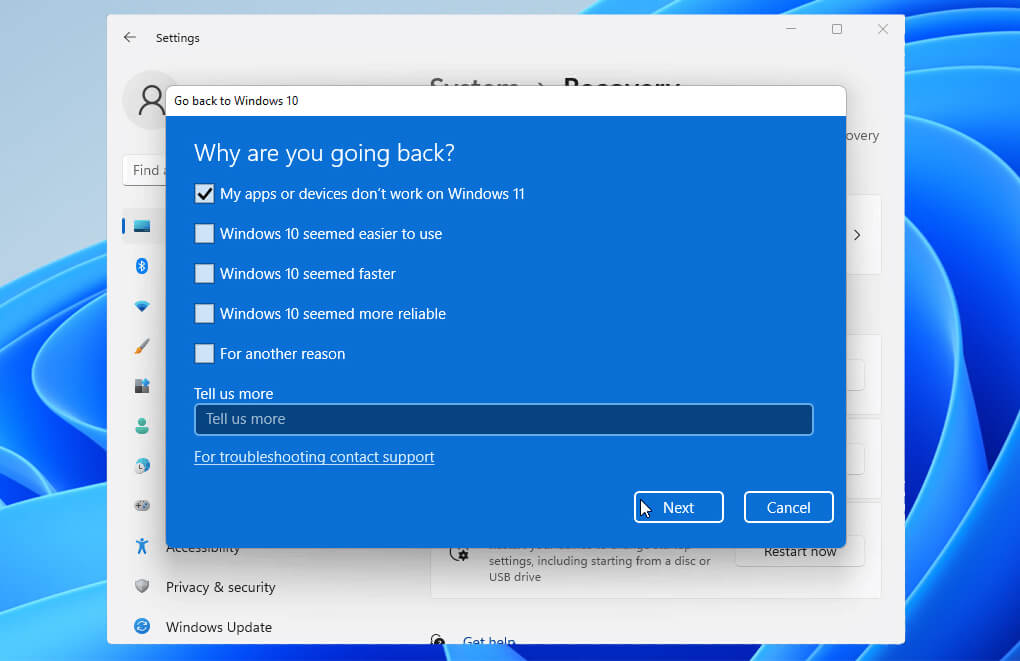
In this step, you will select one of the reasons on your screen and continue to the next step.
Click on Next to continue the operation.
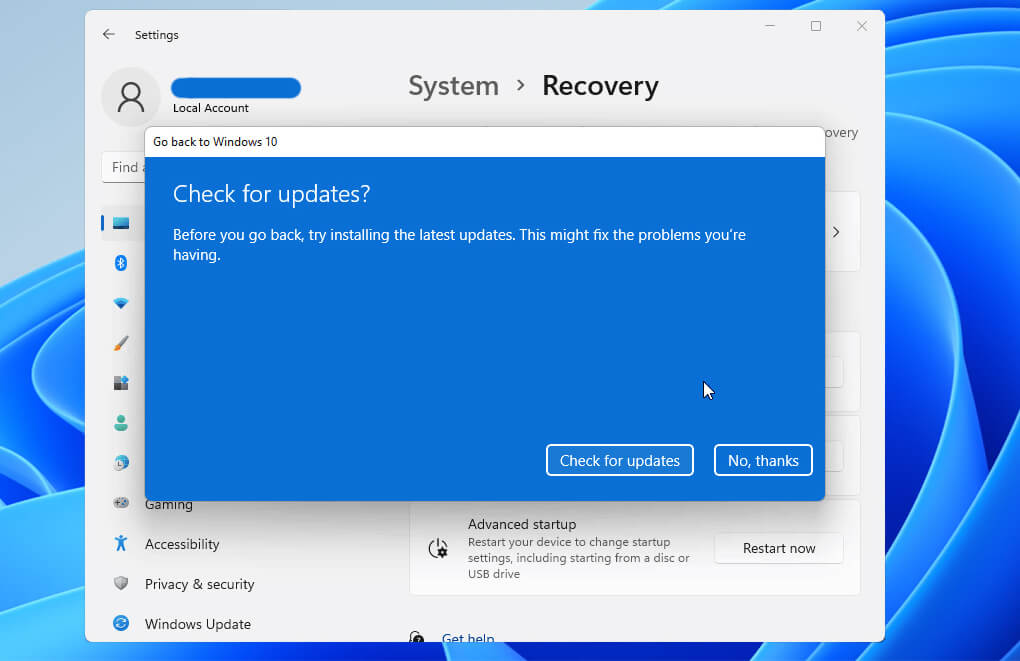
You will be asked to “Check for updates?”. Click on No, thanks, and continue.
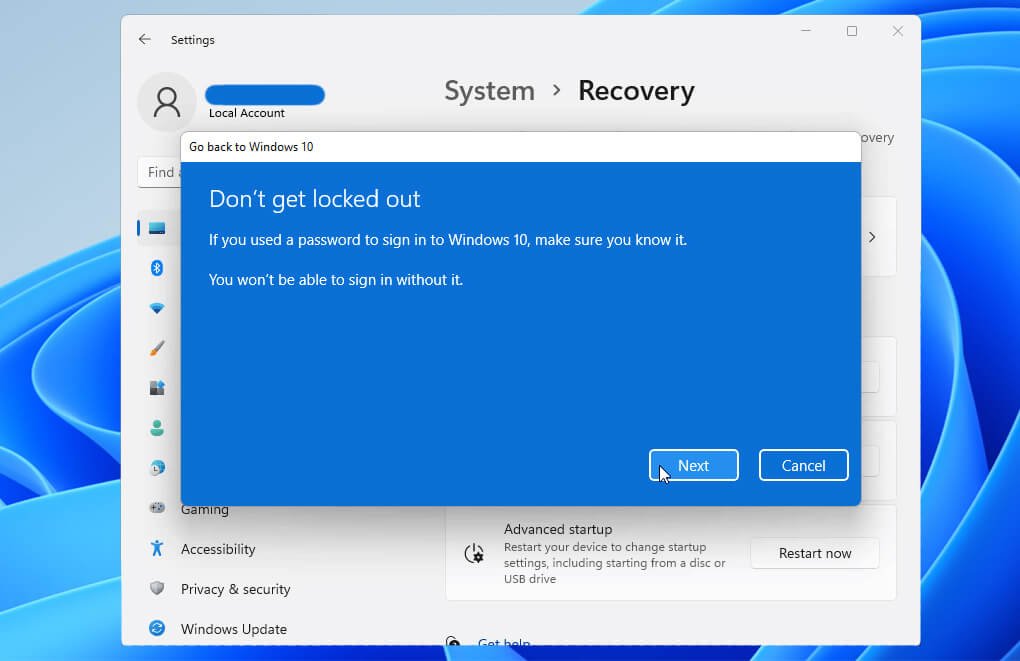
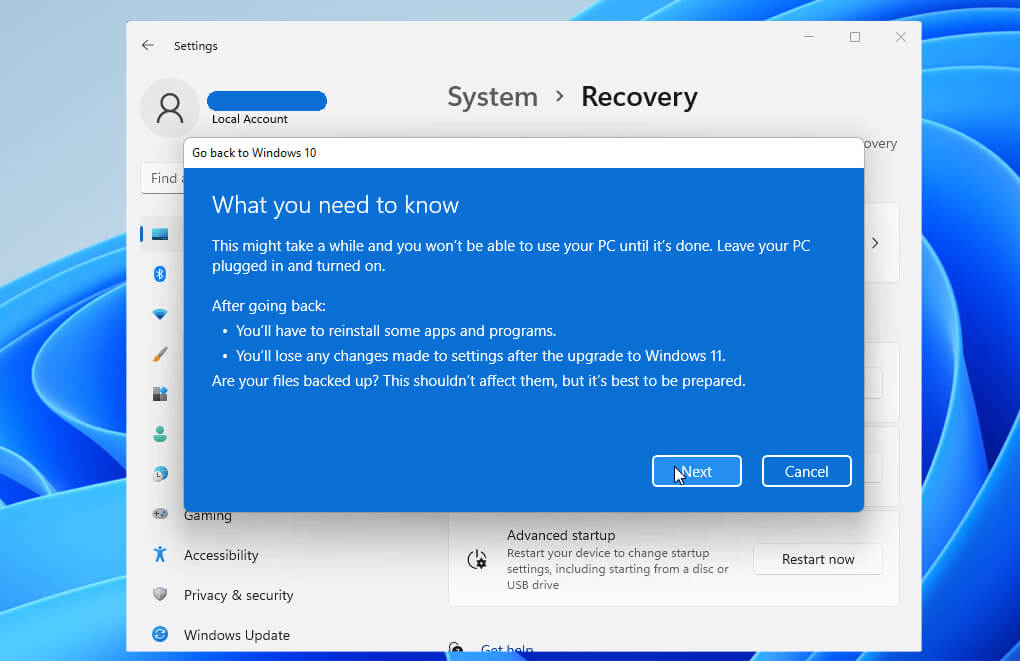
Again, click on Next, and in Don’t get locked out windows, click on Next.
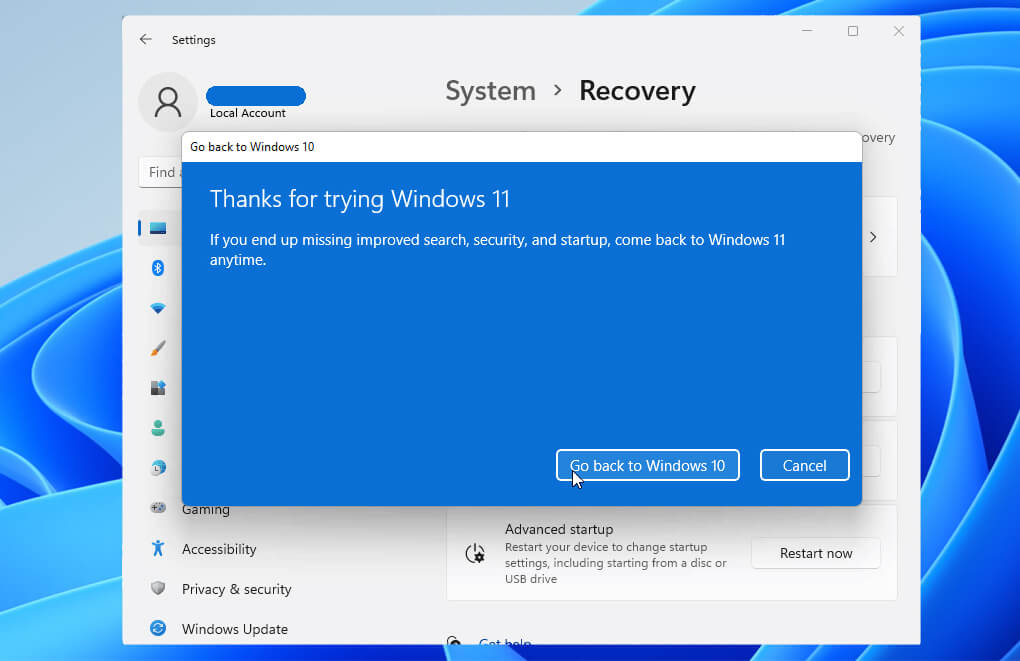
Thanks for trying Windows 11 will appear on your screen. Click on Go back to Windows 10 button, to continue the downgrading process.
Note: users might also see Thanks for trying this build instead of trying Windows 11. This is totally fine, the only reason you are experiencing the change is that you are using the beta version of Windows 11. So, click on the Go back to the previous build button.
Now, your system will restart.
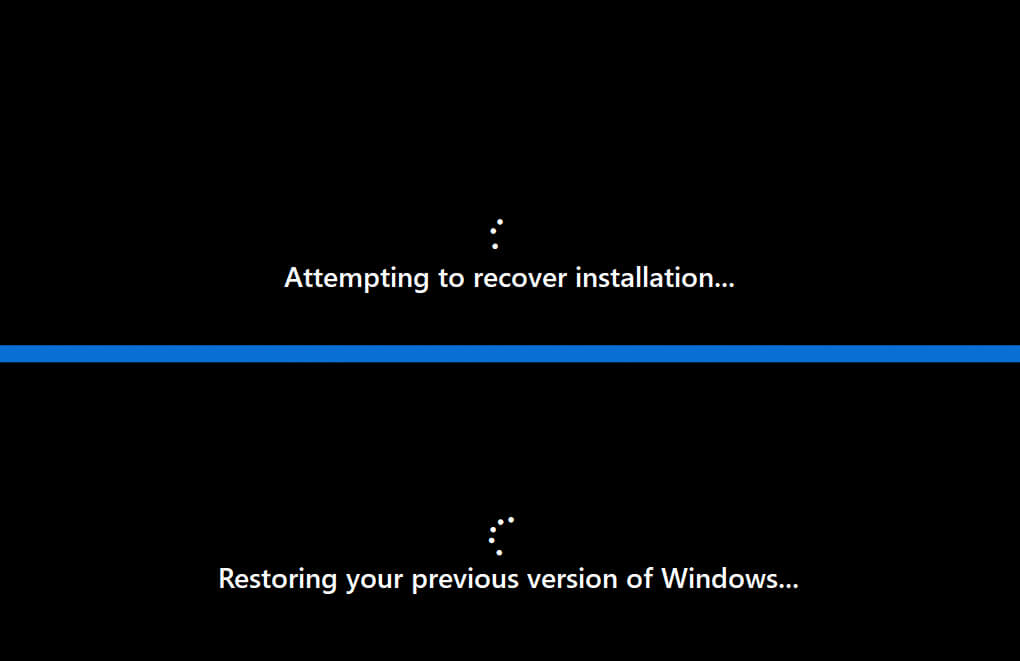
While restarting, you will see “Attempting to recover installation…” on your screen. Wait till the operation gets completed. However; before that, you are going to see “restoring your previous version of Windows…”.
Once the operation got completed, your system will boot your previous version of Windows OS (which is Windows 10) automatically.
2: Downgrade Windows 11 after 10 days of installation
So, let’s downgrade your Windows 11.
We are going to begin the procedure by downloading Windows 10. You can click here to download Windows 10 ISO file by the direct link. Or you can download the latest version of Windows 10 “Free Download Windows 10 20H1- May 2021 Update” form here.
There is also the option to visit the site of Microsoft. There you will select the Download tool now in Create Windows 10 install media. This will provide you with the Media Creation tool for Windows 10.
Related: Download Windows Media Creation Tool for Windows 10
Probably, there are two types of users here. Those who downloaded the ISO file of Windows or those who downloaded the Media Creation Tool. Users with ISO files will need to create a bootable USB of Windows 10 and all the downloading is done; whereas users with Media Creation Tool, they will download the Windows 10 entire setup later.
Users with Medica Creation Tool will need to double click on the mediacreationtool21h1.exe file. A popup will appear, click on Yes.
On other hand, users with bootable USB of Windows 10, are going to boot their USB drive.
Now, both of the users are going to Accept the Microsoft Software License Terms.
Then, select the Upgrade this PC now option.

Click on the Next button, and Accept Terms and Conditions by Windows.
In Choose what to keep, you are going to select Nothing.
Again, click on Next.
Here you are going to click on Install, to start the installation of Windows 10 on your system.
From now on, it is the basic installation of Windows 10. Since you have performed the installation of Windows 10 before, you won’t require any guide on that. However; if you experienced any issues during or after the installation, let us know in the comment section.
We are going to find the solution to that problem as soon as possible. This topic might be interesting for some, so here is “How To Upgrade To Windows 10 From Windows 7 And 8”. Users can also lay their hands on the latest version of Windows 11 here.
Question: Can Windows 11 be downgraded to Windows 10?
You can downgrade your Windows 11 to Windows 10 for sure. Users who are using Windows 11 and it has not been 10 days can use the feature in Settings to downgrade easily.
Any third-party tool or Windows 10 setup file is not required for downgrading. However; users who have installed and used Windows 11 for more than 10 days will need either a Media Creation tool or a bootable USB of Windows 10 to downgrade from Windows 11.
Question: Does it require any tools to downgrade from Windows 11?
If you have completed 10 days of installation then you will need a bootable USB of Windows 10 or the Media Creation tool to downgrade. However; if you haven’t completed the 10 days of installation, then you are going to use the Go back option.
This will downgrade your Windows 11 without any bootable USB of setup file of Windows 10. Within 10 days of installation, Windows 11 keep the system file of the previous version of Windows OS. After 10 days, the system files will be removed automatically.