
How to Create a Windows ISO File with ESD?
A comprehensive guide on how to create a Windows ISO file with ESD. Windows updates often arrive in the form of encrypted ESD files, making it crucial to understand how to convert them into a usable ISO format.
In this step-by-step tutorial, we’ll walk you through the entire process, from acquiring the necessary tools to obtaining the essential install.ESD file. By the end, you’ll have a bootable Windows ISO ready for clean installations and upgrades. Follow along, and let’s get started on creating a powerful installation media tool.
Table of Contents
But first, What is an ESD File?
Those who know about ESD files can skip directly to the procedure. Other users are recommended to at least have a look at this.
An ESD file is short for Electronic Software Delivery. This is a compressed and encrypted file format used by Microsoft to distribute Windows operating system updates and upgrades. It was first introduced in Windows 8.1 and has been used in subsequent versions, including Windows 10.
Here are some key points about ESD files:
1. Compression and Encryption: ESD files are both compressed and encrypted. This means they take up less space compared to traditional installation files (like WIM files) and provide an added layer of security.
2. Used for Windows Updates: When you download a major Windows update or upgrade through Windows Update, the installation files are typically delivered in the form of ESD files.
3. Conversion to ISO: Users may sometimes want to convert ESD files to ISO format. This allows them to create bootable installation media for performing clean installations of Windows.
4. Cannot be Directly Mounted: Unlike WIM files, ESD files cannot be directly mounted. This means you can’t easily explore their contents or make modifications without first converting them to another format.
5. Supported by DISM: The Deployment Image Service and Management Tool (DISM) utility in Windows can work with ESD files. It can be used to extract, apply, or convert ESD files.
6. Encrypted ESD Files: Some ESD files are encrypted to prevent unauthorized access or tampering. These encrypted files require additional steps to decrypt before they can be used.
Overall, ESD files play a crucial role in the distribution of Windows updates, helping to make the process more efficient and secure. However, for certain purposes like creating bootable media, users may need to convert them to a different format like ISO.
How to Create a Windows 10 ISO with ESD?

Here is a detailed guide on how to create a bootable Windows 10 ISO from a Windows 10 ESD file. This method is useful for users who want to perform a clean install of Windows 10 using bootable media.
Step 1: Download Required Tools
Creating a Windows ISO file from an ESD file is typically done using specialized tools due to the encryption and compression applied to ESD files. While it’s possible to manually extract and convert the contents, it’s a complex process and is not recommended for most users.
Using tools like the ESD Decrypter simplifies the task and ensures a smoother conversion process. These tools are specifically designed to handle ESD files and automate the conversion to a usable ISO format.
Attempting to bypass these tools and manually handle the conversion can lead to potential errors or difficulties in creating a bootable ISO file. Therefore, using a dedicated tool is the recommended and safest approach for most users.
1: Download the ESD Decrypter Tool
Navigate to this page and download ESD Decrypter from the direct links given.
Save the downloaded file to a location on your computer.
2: Extract the Tool
Locate the downloaded zip file and extract its contents to a folder of your choice. For this, you can use applications like WinRAR.
Step 2: Acquire the install.ESD File
In order to create a Windows ISO file from an ESD, you’ll need the “install.ESD” file from your Windows installation. This file is typically found in the “$Windows.~BT\Sources” directory, which is created when you initiate a Windows Update.
Here’s how you can find it:
- Open the Start Menu.
- Click on Settings.
- Click on Update & Security.
- Navigate to Windows Update.
- Click on Check for updates.
- Allow Windows Update to download any available updates, including a new build of Windows 10.
- When prompted, schedule a restart for your computer.
Reminder: As soon as the ESD file has been downloaded to your computer, it will be saved to the following hidden directory:
C:\$Windows.~BT\SourcesStep 3: Decrypt the ESD File using the ESD Decrypter Tool
In the process of creating an ISO file from an ESD with the ESD Decrypter tool, the tool itself generates the ISO file and does not require you to select a specific device. The ISO file is created in the same directory where you have the ESD Decrypter tool and the install.ESD file (will be shown).
1. Open File Explorer (Win+E) and navigate to the folder where you extracted the ESD Decrypter Tool.
2. Find and double-click on “ESDtoISO.cmd”. This will launch the ESD Decrypter utility.
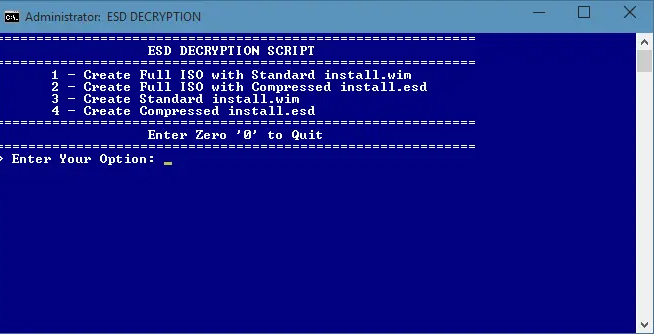
3. In the ESD Decrypter utility, press “1” on your keyboard and then press Enter. This option is for creating a Windows 10 ISO that contains an “install.wim” file.
4. The utility will now automatically find the “install.ESD” file you placed in the same folder. It will then begin decrypting and creating a bootable Windows 10 ISO file. You will find your ISO file of Windows here.
5. The process may take some time, so be patient. It could take up to half an hour or even more, depending on your computer’s hardware.
6. Ignore any errors pertaining to missing keys. These can be safely ignored.
7. Once the process is complete, you’ll have a bootable Windows 10 ISO file. This file can be burned to a DVD or used to create a bootable USB drive for clean installations.
The ISO file is generated in the same location where you have the ESD Decrypter tool. It’s important to note that this ISO file is meant for installation purposes and not for running directly on a device.

