How to Increase C Drive Space Storage on Windows 11?
Welcome to our comprehensive guide on increasing the available storage space on the C drive in Windows 11. As we increasingly rely on our computers for various tasks and store larger amounts of data, managing disk space becomes crucial to ensure optimal performance and usability.
The C drive, often referred to as the system drive, is where Windows and most of your applications are installed by default. Over time, as you install new programs, accumulate files, and download updates, the C drive may start running out of space, affecting your system’s performance and functionality. To alleviate this issue, it becomes necessary to expand the C drive, allowing it to accommodate the growing demands of your operating system and applications.
In this guide, we will explore various methods to increase the available space on your C drive in Windows 11. We’ll discuss both built-in Windows tools and third-party solutions.
Please note that expanding the C drive requires careful consideration and attention to detail. Before proceeding with any method mentioned in this guide, it is essential to back up your data and ensure you have a reliable power source to prevent any potential data loss or system interruptions.
So, whether you’re struggling with a constantly dwindling C drive or simply want to optimize your system’s storage capacity, let’s dive into the step-by-step instructions and discover how to increase the C drive space on Windows 11.
Table of Contents
Why Expanding C Drive on Windows is Essential?
There are several reasons why you may need to increase the available space on the C drive in Windows 11. Here are some common scenarios where expanding the C drive becomes necessary:
1. Insufficient storage: As you install new applications, download updates, and accumulate files, the C drive can gradually fill up, leaving you with limited storage space. This can result in frequent low disk space warnings, system slowdowns, and difficulties in installing new programs or updates.
2. Windows updates: Windows updates, especially major feature updates, require a significant amount of disk space to install. If your C drive is already close to its capacity, updating Windows 11 can become problematic. Expanding the C drive ensures that you have enough space to accommodate future updates seamlessly.
3. Application installations: Some applications, particularly large software suites or games, require a significant amount of disk space for installation. If you frequently install resource-intensive applications, your C drive may quickly run out of space. Expanding the C drive allows you to comfortably install and use such applications without storage limitations.
4. System performance: When the C drive is nearly full, your system’s performance can be negatively impacted. Windows requires free space on the C drive for tasks like caching, virtual memory, and temporary file storage. Insufficient space can lead to slower boot times, program crashes, and overall sluggishness.
5. File management: The C drive often houses user-generated files, such as documents, pictures, and videos. If you regularly work with large files or engage in media-intensive activities, you may find yourself running out of space quickly. Increasing the C drive’s capacity enables you to manage your files more efficiently and avoid constant file transfers or deletions.
By expanding the C drive space on Windows 11, you can address these issues, enhance your system’s performance, and ensure you have ample storage for future needs. It allows you to enjoy a smoother computing experience without worrying about low disk space constraints.
How to Increase C Drive Storage on Windows 11?

To increase the C drive space on Windows 11, you have several options to choose from. Here are three commonly used methods:
Method 1: Disk Cleanup:
Windows 11 provides a built-in utility called Disk Cleanup, which helps remove unnecessary files and free up space on your C drive. Here’s how to use it:
Press the Windows key on your keyboard, type “Disk Cleanup“, and open the Disk Cleanup utility.
Select the C drive from the dropdown menu and click OK.
Disk Cleanup will calculate the amount of space you can free up on your C drive. This process may take a few moments. Once the calculation is complete, you’ll see a list of file types that you can delete. These typically include temporary files, system files, and other items that are safe to remove.

Check the boxes next to the file types you want to delete or select Clean up system files to include additional options.
Click OK to proceed and confirm the deletion.
Disk Cleanup will remove the selected files, freeing up space on your C drive. Depending on the size and number of files, the process may take some time.
Method 2: Storage Sense:
Windows 11 introduces an enhanced feature called Storage Sense that helps automatically manage disk space. Here’s how to enable and configure Storage Sense to free up space on your C drive:
Go to Settings by pressing Windows key+I on your keyboard.
In the Settings window, click on System and then select Storage from the left sidebar.
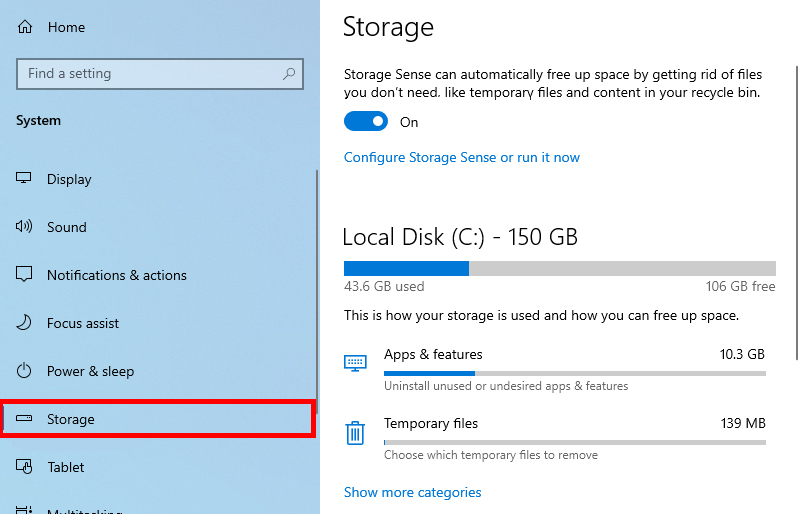
Toggle on the Storage Sense option to enable it.
Click on Configure Storage Sense or run it now.
In the Storage Sense settings, you can customize various options according to your preferences.
Under Temporary Files, you can choose which types of files Storage Sense should clean up. You can select options like temporary files, recycle bin, and downloads folder.
Additionally, you can enable the Delete files in the Downloads folder that haven’t changed in option and set a specific timeframe. This helps remove unused files from your Downloads folder automatically.
Scroll down to the Free up space now section and click on Clean Now to initiate the immediate cleanup process. Storage Sense will clean up the selected files and free up space on your C drive based on your configured settings.
By utilizing Storage Sense, you can automate the process of freeing up space on your C drive, ensuring it remains optimized without manual intervention.
Method 3: Disk Partitioning and Extend Volume:
Note: It is essential to back up your data before attempting any disk partitioning or extending operations.
If you require more significant space expansion, you can utilize disk partitioning and extend volume features within Windows 11. We are going to shrink other hard disk on your system first then we will increase the C drive.
If you don’t want to shrink other drives and already have unallocated space then you will open Disk Management and directly Extend Volume.
Tip: you will also find users using CMD. However; we recommended Disk Management due to its easy user interface.

Press the Windows+X on your keyboard and select Disk Management from the menu that appears. This will open the Disk Management utility. You can also use “diskmgmt.msc” on RUN too.
In Disk Management, locate the partition adjacent to the C drive that has free space. Right-click on this partition and select Shrink Volume.
Specify the amount of space to shrink from the selected partition. The value you enter represents the size of storage added to the C drive.
Click Shrink to initiate the shrinking process. The process may take some time, depending on the size of the partition and the speed of your system. Once the shrinking process is complete, you will see unallocated space next to the C drive.
Right-click on the C drive and select Extend Volume. This will open the Extend Volume Wizard.

In the Extend Volume Wizard, click Next to proceed.
The wizard will automatically select the maximum available space to extend the C drive. If you want to allocate a specific amount, you can adjust the value accordingly.
Click Next and then Finish to complete the process.
The C drive will now be extended using the unallocated space, effectively increasing its storage capacity.
It’s important to note that performing disk partitioning and extending operations carries some risks, such as potential data loss if not done correctly. It is strongly recommended to back up your data before attempting any disk management operations and proceed with caution.
Additional Tips for Increasing C Drive Space:
In addition to the methods mentioned above, here are some tips to further optimize the storage space on your C drive:
Uninstall Unused Applications: Review your installed programs and remove any that you no longer use or need. This helps free up valuable space on your C drive.
Move Files to Other Drives: If you have multiple drives or partitions, consider moving files such as documents, pictures, and videos to a different drive to alleviate space constraints on the C drive.
Clear Browser Cache and Temporary Files: Web browsers often accumulate a significant
These methods provide built-in solutions for increasing C drive space on Windows 11. However, if you require more advanced features or have complex disk management needs, you may consider using third-party partition management software, which offers additional flexibility and functionality.
Remember to exercise caution and double-check your actions before modifying disk partitions to avoid unintended data loss. And that is it. This was how to increase C drive space on Windows 11. Got questions related? Comment down.