
Best Way to Clean Temporary Files on Windows 10 and 11?
Your system on low storage can make your life hard as you can’t download new files or perform any kind of installation. In Windows OS having temporary files are common and users have abundant of them. With cleaning temporary files on Windows 10 or 11, you can:
- Improve performance- you and I both know that having a system on low storage is slow as compared to a system with free storage. Same thing can be also experienced on mobile phone or other similar devices. How to Make Laptop Faster on Windows?
- New installation- having storage means that you can add new applications, add-ons (on browsers) or games on your system. Having low storage won’t let you to even download a single media file.
- Free from threats- by cleaning useless files, there is also possibility of deleting malware files too. How to Increase C Drive Space in Windows 10?
- Update your system- clean your system to download latest updates by Microsoft.
Table of Contents
How to clean temporary files on Windows 10 and 11?

Most of the temporary files are leftovers by applications, games, or even Windows. A fair amount of junk or temporary files are created on each new installation of Windows OS. Even though the files of earlier versions of Windows OS will be deleted within 10 days, still deleting them will be quite thoughtful.
For cleaning temp files on Windows 10 or Windows 11, you can use Settings, built-in applications, or even third-party applications. Before starting any of the methods below, let’s start with your Recycle bin. Right-click on your Recycle bin and delete all the files. This is quite handy to create space on your system.
Note: any of the methods given below can be used on Windows 10 and Windows 11. There might be minor changes still the entire concept is the same.
Use Disk Cleanup to clean temp files on Windows
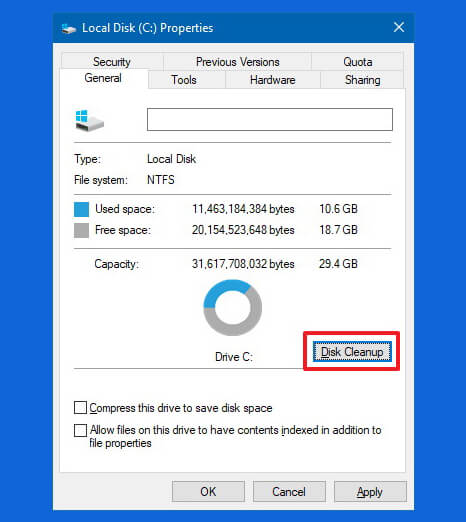
Using Disk Cleanup is the simple and most reliable way to clean temp files. For this purpose, you will open File Explorer by opening This PC. Then you will right-click on the C: drive (or any drive with Windows system files) and select Properties.
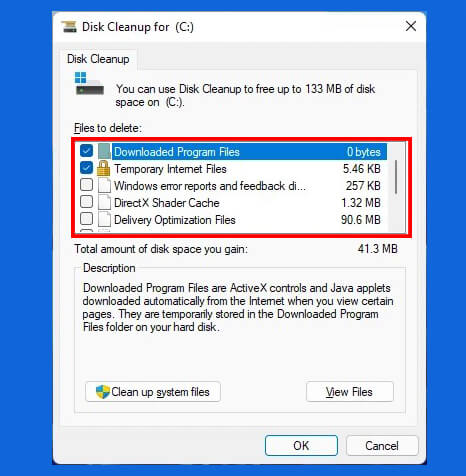
Then you will select the Disk Cleanup option and select Clean up system files. Here you are going to select all the files that you don’t want.
Now click on the OK button and click on Delete Files.
Related Topic: How to Flush DNS Cache on Windows 11?
Clean files with Settings
There are slight changes of procedure in Windows 10 v1809 as compared to Windows10 v1903 or later. The same procedure that is used in Windows 10 v1903 or later is also applicable on Windows 11 too.
Cleaning files on Windows 11 and Windows 10 v 1903 or later
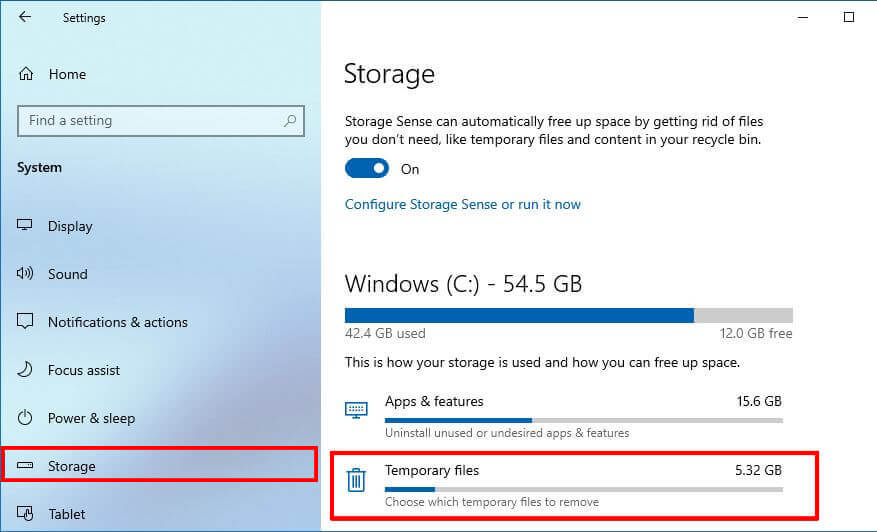
Start the procedure by going to Settings > System > Storage. There you will find the Local Disk /Local storage section and under this, you will find Temporary files. Click on the Temporary files option and select all the files that you want to delete.
Click on Remove files and all the files will be removed from your system.
Same procedure on Windows 10 v1809
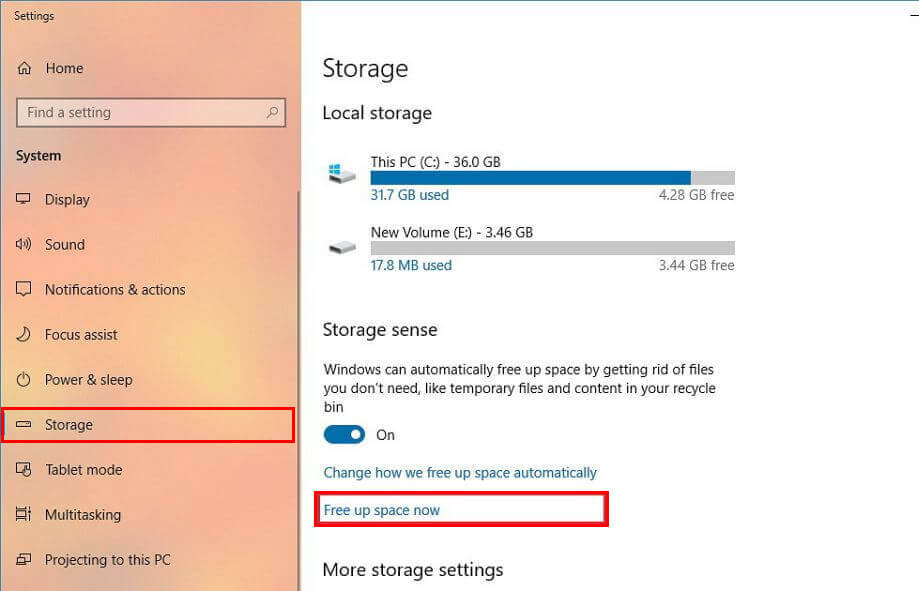
For users with Windows 10 v1809 or later, they will need to go to Settings > System > Storage.

Inside the Storage they will find the Free up space now option, click on it you will experience:
- Windows upgrade log files.
- System created Windows Error Reporting files.
- Windows Defender Antivirus.
- Windows Update Cleanup.
- Thumbnails.
- Temporary files.
- Recycle Bin.
- Temporary Internet Files.
- Delivery Optimization Files.
- DirectX Shader Cache.
- Previous Windows Installation(s).
Select all the files by checking the box beside and clicking on Remove files to remove all the temporary files from your Windows 10.
Related Topic: How to Clear DNS Cache Windows 10 (Server and Workstation)?
Storage Sense option for cleaning temp files
If you are using Windows 10 v1903 or later like Windows 10 v20H2 or you are using Windows 11 then you can use the Storage Sense option too.

Start cleaning your Windows OS by going to Settings > System > Storage and in the Storage section, you will find a toggle switch. Turn on the toggle switch and click on the Configure Storage Sense or run it now option.
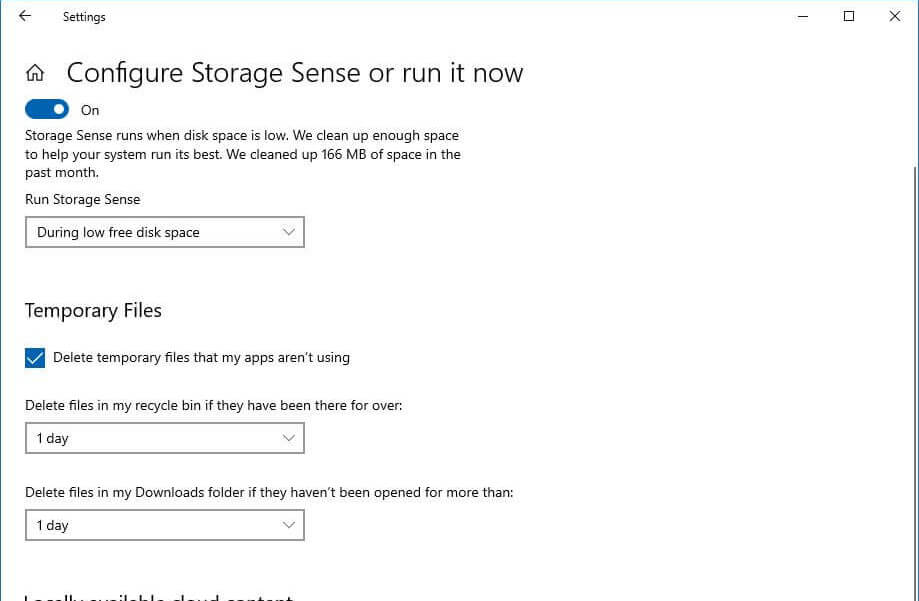
Here you are going to adjust all the options according to you. This will help you clean the junk or temp files automatically according to your adjustments, there won’t be any manual cleaning anymore.
Use RUN for cleaning Windows 10 or 11
Using RUN is another method to clean Windows OS temp files. Go to the Start menu and type “run”.
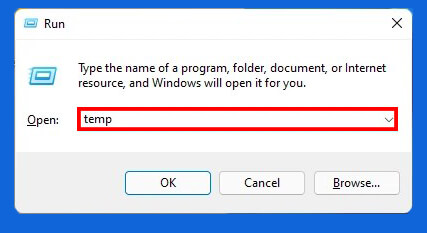
Open RUN and type “%temp%” for Windows 10 and “temp” for Windows 11. Soon a new window will appear on your screen. Select all the files in File Explorer by using CTRL+A or using the mouse cursor and delete them.
Clean with CMD
For cleaning temp files on Windows 10 or Windows 11, you will need to open CMD. Type “cmd” in the Start menu and right-click on it.
Select the Run as administrator option and the command line will appear. There you will use the command below:
del /q/f/s %TEMP%\*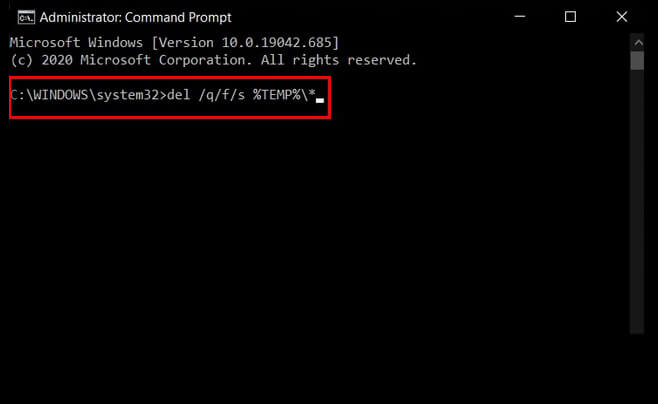
The command above will remove all the temporary or junk files on your Windows 10 or Windows 11. Once the procedure got completed, you will give your system a restart. Congratulation, you have successfully cleaned your Windows 10 or Windows 11.

