
How to Take A Screenshot on Windows 11? [Quick & Easy]
Screenshots are a great way to capture information on your computer screen. Whether you want to save a funny moment from a video, capture important information for work, or save a memory from your favorite game, screenshots make it easy. With the release of Windows 11, taking screenshots has become even simpler and more efficient.
And here you are going to use these easy methods to take screenshots on Windows 11 and show you how to customize your screenshot experience to meet your specific needs. So, let’s get started and take control of your screen captures.
Related Topic: How to Take a Screenshot on Windows 10?
Table of Contents
Quickly take a screenshot on Windows
Here is a quick method that can enable you to take screenshots. You can capture the entire Windows 11 screen using these keys on your keyboard: Print or Fn+PrntScn for some laptops.
You can take a screenshot of any active window and copy it to the clipboard: Keys Alt and Print keys.
Then immediately save a screenshot of the entire screen to the (pictures/screenshots directory) using Windows+Print.
Windows+Shift+S will take a screenshot of a selected area and save it to the clipboard.
If you find the quick guide above challenging then you can also use the step-by-step given below.
Capture screen on the clipboard
So, now let’s continue to step by steps method of taking screenshots. In this one, we are going to use some shortcut keys.

Begin by using the Print or PrintSc/PrintScrn keys.
Then you are going to open the Paint application from the Start menu. Paste the captured image in Paint by using the CTRL+V keys or clicking on Paste > Paste.
Save the image to any folder that you feel is easy. You will click on the save icon on the top of your screen or use the CRTL+S keys to save the screenshot. Name your new screenshot taken and select Save as type as JPEG or PNG.
Screenshot with Snipping tool
The snipping tool is a built-in application used for taking screenshots on Windows. To access the Snipping tool, you will simply search for “snipping tool” in the Start menu. Select the application and open it.
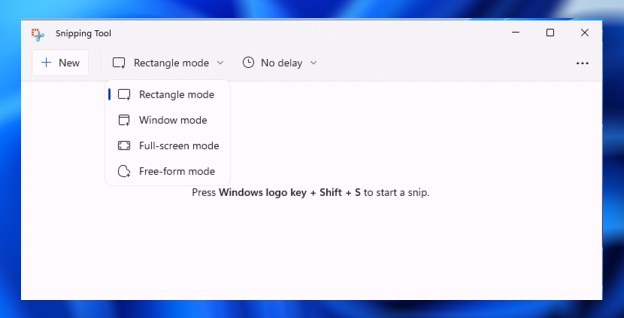
It has numerous useful features that can make things easy for you. Here are some of the key features:
- Multiple Snipping Modes: The Snipping Tool allows you to capture screenshots using different snipping modes, such as rectangular, free-form, window, and full-screen.
- Delayed Screenshot: With the delayed screenshot feature, you can set a timer for your screenshot, which is useful when you need to capture something that requires preparation before being captured.
- Annotation Tools: The Snipping Tool includes basic annotation tools such as a pen, highlighter, and eraser, making it easy to annotate and mark up your screenshots.
- Save to File: Screenshots captured using the Snipping Tool can be saved to your computer in different file formats, such as PNG, GIF, and JPG.
- Copy to Clipboard: You can also choose to copy the screenshot to the clipboard for easy pasting into other applications.
These features make the Snipping Tool a versatile and powerful tool for capturing screenshots on Windows 11. Whether you need to capture a simple screenshot or annotate and save a more complex image, the Snipping Tool has you covered.
Where do screenshots go on Windows 11?
After taking screenshots, you might be wondering where are the images that you have taken. Are your files saved or not; are they all deleted? Don’t worry, you can find your screenshots images taken in “C:\Users\[User Name]\Pictures\Screenshots”.
Either open This PC and paste the path given or you can check it by opening the User Folder on the desktop. Navigate down to Picture and then Screenshots. Here you will find all the images taken by you.
Take screenshots of web content on Windows 11
If you need to take a picture of a specific area or the entire screen, then y You will need either browser extensions or use built-in tools (if present). Browsers like Google Chrome or Firefox need third-party extensions such as FireShot or Awesome Screenshot.

However; if you are using Opera Browser then you can use the built-in options. For this, you will click on the camera icon and take a screenshot. Save the image in any folder and select the file format.