
Fixed: Unallocated Space Cant Be Used in Windows
While we were trying to figure out the best way to fix “api-ms-win-crt-stdio-\1-1-0.dll“, we noticed that there is a portion of our hard drive that can’t be used. We can’t use the unallocated space on our Windows 10, which brought us here.
The computer’s hard drive is used to store all your files, pictures, and important stuff. But, it throws a bit of a puzzle on our way with any Unallocated Space.
To put it in perspective, it’s like finding a hidden room in your house and not knowing how to use it. Don’t worry, we’re here to help! In this guide, we’ll show you how to turn that unused space into something useful. We’ll use easy steps to allocate those unallocated spaces that can’t be used on Windows.
Table of Contents
What causes the Unallocated space on Windows?
The issue of unallocated space on a hard disk that cannot be used in Windows can be caused by several factors. Here are the most common reasons:
1. MBR vs. GPT Partition Styles
MBR (Master Boot Record): MBR has limitations, such as supporting a maximum capacity of 2TB and allowing only up to four primary partitions (or three primaries plus one extended partition). If the hard disk is larger than 2TB or has already reached the limit of primary partitions, unallocated space may not be usable.
GPT (GUID Partition Table): GPT does not have the same limitations as MBR. It supports disks larger than 2TB and allows for an almost unlimited number of partitions.
2. Incorrect Disk Format
If the disk format is not supported by Windows (e.g., it’s formatted as a file system not recognized by Windows), the unallocated space may appear but cannot be used.
3. Incorrectly Connected Peripheral Devices
Sometimes, external devices like USB drives, external hard drives, or memory cards can confuse Windows, causing it to recognize them as potential default locations for creating new partitions.
4. Inactive Partitions
An inactive partition is one where the operating system is not located. Windows may not allow you to create a partition on an inactive one. Activating the partition can resolve this.
5. Improper Disk Management
If there are issues with the Disk Management tool itself, it may not be able to create partitions from unallocated space.
6. Corrupted Disk or File System
If the disk or file system is corrupted, it may prevent Windows from properly utilizing unallocated space.
7. Partition Table Errors
Errors in the partition table, which is like a map of the disk, can prevent Windows from recognizing unallocated space.
8. USB 3.0 Drive Issues
In some cases, using a USB 3.0 drive for installing Windows may lead to issues with recognizing and utilizing unallocated space. Switching to a USB 2.0 drive may resolve this.
Understanding these potential causes can help users diagnose and address the issue of unallocated space that cannot be used in Windows. Depending on the specific situation, different solutions may be necessary.
How to fix the hard drive says unallocated space can’t be used?
Encountering unallocated space that cannot be utilized on Windows can be a frustrating experience, especially when trying to create new partitions. Now that we understand what causes the unallocated space, let’s fix it.
Important Considerations: The conversion process will erase all data on the disk. It’s crucial to have a complete backup of any important files before proceeding.
Method 1: Convert MBR to GPT
The Master Boot Record (MBR) partition style has limitations, especially with larger disks and multiple partitions. Converting to the GUID Partition Table (GPT) style can often resolve the issue. Here’s how you can do it:
Related Topic: How to Convert MBR to GPT without data loss on Windows 10?
1. Using Disk Management (Data Loss)
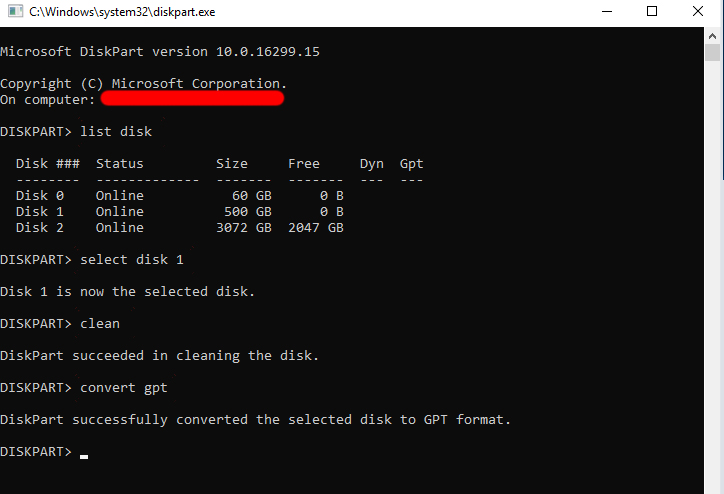
- Press Win+R, type “diskpart.exe”, and press Enter.
- In the command prompt, type the following commands in order:
list disk- “select disk” (replace * with the disk number)
- “clean” command erases all partitions, volumes, and formatting from the selected disk. This effectively wipes the disk clean, so make sure to back up any important data before executing this command.
- “Convert gpt“. This command initiates the conversion of the selected disk from MBR to GPT format.
This method may lead to data loss, so ensure you have a backup before you proceed with the process.
2. Using MiniTool Partition Wizard (Data Safe)
Or alternatively, you can also download and install MiniTool Partition Wizard or something similar.
Once downloaded, you will do the installation and run it. Select the disk you want to convert and click on Convert MBR Disk to GPT Disk from the left action panel.
Follow the prompts to complete the conversion.
Method 2: Convert One Primary Partition to Logical
Converting one primary partition to a logical partition can fix the issue of being unable to create a partition on unallocated space due to specific limitations imposed by the Master Boot Record (MBR) partitioning scheme. Here’s how you are going to do it:
1. Using Disk Management
- Open Disk Management by pressing Win+X and selecting Disk Management.
- Locate the primary partition you want to convert, right-click it, and select Delete Volume.
- Right-click the unallocated space, select New Simple Volume, and follow the prompts.
This way, you will convert the disk that has reached the limit of primary partitions on an MBR disk, converting one of them to a logical partition can free up space for a new partition.
2. Using MiniTool Partition Wizard
Or alternatively, you can also download and install MiniTool Partition Wizard or something similar.
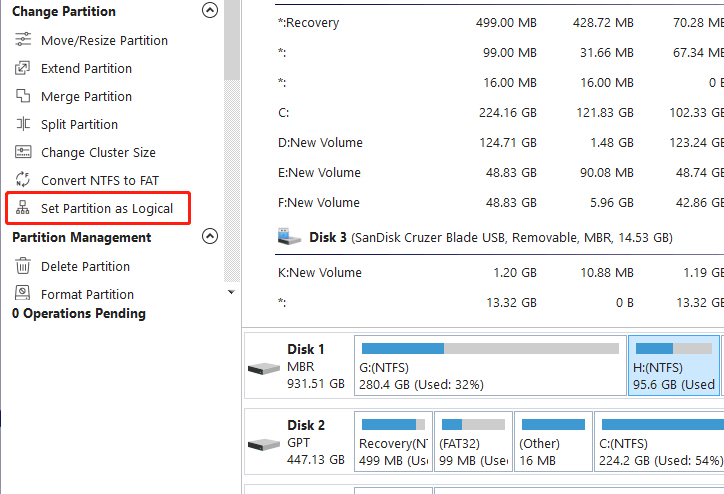
Once downloaded, you will do the installation and run it. Select the primary partition you want to convert, right-click, and select Set Partition as Logical.
Follow the prompts to complete the process.
Method 3: Reinitialize hard drive from MBR to GPT via Disk Management
Reinitializing a hard drive from Master Boot Record (MBR) to GUID Partition Table (GPT) via Disk Management is a process that involves changing the underlying partitioning scheme of the disk. Follow these steps:
Open Disk Management
Press Win+X on your keyboard and select Disk Management. Alternatively, you can right-click on the Start and choose Disk Management.
Select the Target Disk
In Disk Management, you’ll see a list of all connected drives. Identify the disk you want to reinitialize. It’s important to be absolutely sure you’ve selected the correct disk, as the process will erase all data.
Delete Existing Partitions
To convert the disk, you must first delete all existing partitions on it. Right-click on each partition listed and select Delete Volume or Delete Partition. This process will remove all data on those partitions.
Initialize the Disk
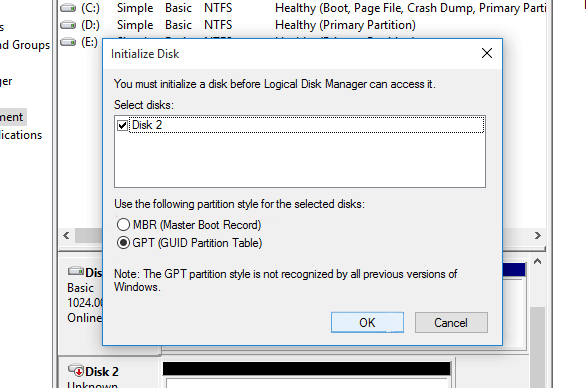
After all partitions have been deleted, you’ll see the disk listed as Unallocated. Right-click on the disk itself (not on any partitions) and select Initialize Disk. Choose GPT as the partition style.
Create New Partitions (Optional)
Now that the disk is initialized as GPT, you can create new partitions. Right-click on the unallocated space and select New Simple Volume. Follow the wizard to allocate space and assign a drive letter.
Format New Partitions (Optional)
After creating new partitions, they will be listed as Raw and need to be formatted before use. Right-click on each new partition and select Format. Follow the formatting wizard to choose a file system (NTFS is recommended for Windows).
Ensure that you’ve selected the correct disk. Mistakenly converting the wrong disk can lead to data loss.
This process can only be performed on disks that do not contain the operating system. If the system is installed on the disk you want to convert, you’ll need to use a different approach or clone the system to another disk first.
Method 4: Use a USB 2.0 Drive for Installation
Some users have reported issues with USB 3.0 drives during Windows installation. Switching to a USB 2.0 drive may resolve this problem. Here’s how:
Replace the USB Drive
If you’re using a USB 3.0 drive, try using a USB 2.0 drive instead.
Ensure the drive is properly formatted and contains the Windows installation files.
Restart the Installation Process
Insert the USB 2.0 drive and restart the Windows installation process.
Conclusion
By applying these methods you can effectively address the issue of unallocated space that cannot be used on Windows. Always remember to backup your data before performing any disk operations for added safety. With these techniques, you’ll be able to manage your disk space efficiently and optimize your system’s performance.
Depending on the specific situation and user preference for data safety, one of these methods should help resolve the issue of unallocated space that cannot be used on Windows.
