
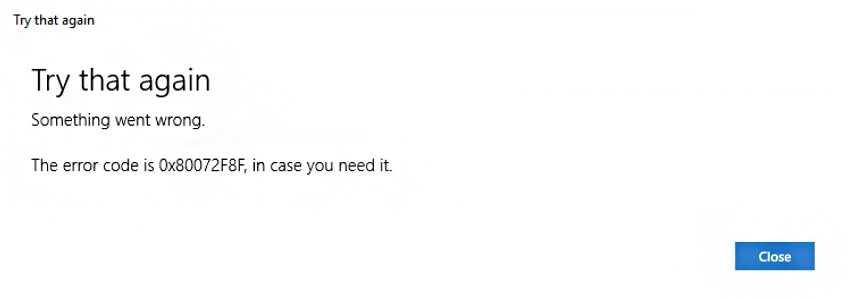
How to fix Error Code 0x80072f8f on Windows?
Error code 0x80072f8f typically appears in the context of Windows OS and is related to issues with the Windows Update feature.
Error 0x80072f8f can also occur in situations related to Windows activation, Windows updates, and downloading apps and games from the Microsoft Store.
When attempting to activate Windows, update the operating system, or install apps and games from the Microsoft Store, the error code 0x80072f8f may indicate a problem with the Secure Sockets Layer (SSL) certificate validation.
The error message “0x80072f8f” often occurs when the system clock on your computer is set incorrectly or does not match the current date and time. Windows Update relies on accurate time and date information to verify and authenticate updates, and when there is a mismatch, it can result in this error.
By ensuring that your computer’s date, time, and time zone are set correctly and synchronizing with a reliable time server, you can often resolve the error code 0x80072f8f in the context of Windows activation, updates, and Microsoft Store downloads. So, check the date and time and avoid time wasting.
Mostly fixing the date and time will fix the issue. However; if the problem persists then apply the methods given.
Table of Contents
Common Reasons for 0x80072f8f Windows Error Code
Error 0x80072f8f in Windows 10 can occur due to several reasons. Some of the common causes include:
1. Incorrect date and time settings
2. Expired or invalid SSL certificate
3. Firewall or antivirus software interference
4. Internet connectivity issues
5. Proxy server misconfiguration
6. Windows Update service issues
7. Corrupt DLL files
Fix Error Code 0x80072f8f on Windows

To resolve error code 0x80072f8f, you can follow these steps:
Method 1: Set Correct Date & Time on Windows
As we mentioned above, the first method is to set the correct date and time. To set the correct date and time on Windows:
1. Right-click the system tray clock or open the Date & time settings.
2. Enable Set time automatically or click Sync now to update it.
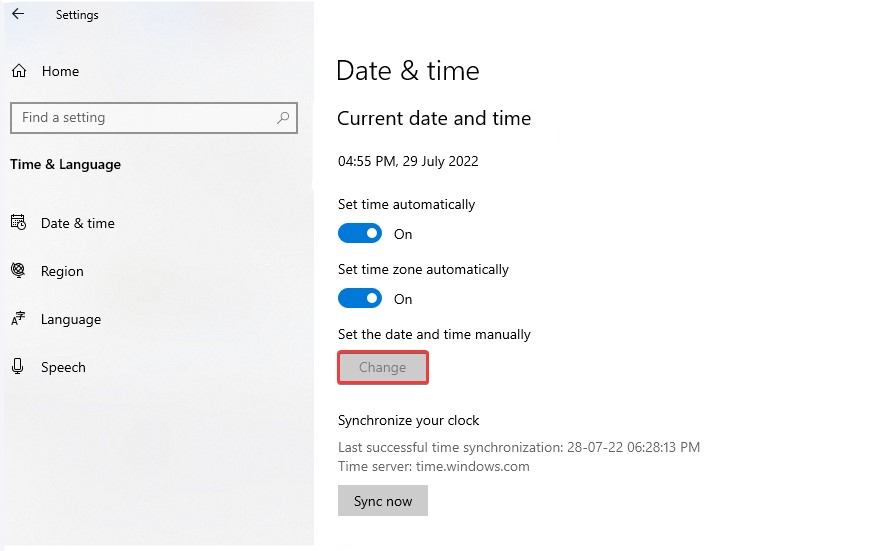
3. Or use Change to manually adjust the date, time, and time zone.
4. Apply the changes and close the settings.
Method 2: Update Windows from Settings
Maybe there are some issues within your OS. By updating your OS; not only you will bring new features but also fix issues on your OS.
1. Open the Start menu and click on the Settings.
2. In Settings, select Update & Security.
3. In the Update & Security section, click on the Windows Update.
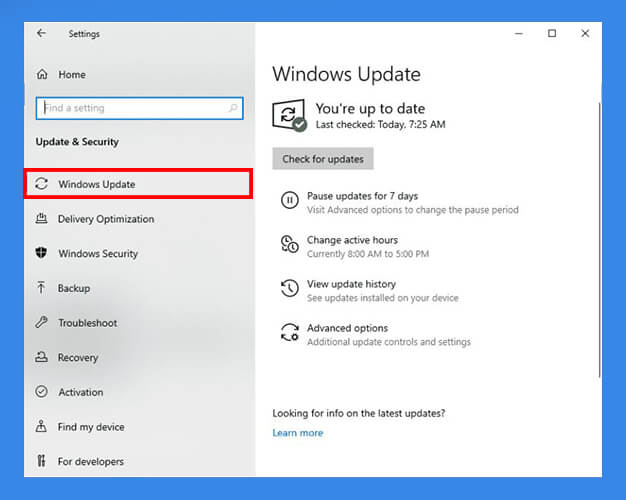
4. Click on the Check for updates button. Windows will now check for available updates.
5. If updates are found, click on the Download or Install button to begin the update process. Make sure your computer is connected to the internet during this process.
6. Windows will download and install the updates automatically. You may need to restart your computer to complete the installation of certain updates.
After the updates are installed and your computer has restarted (if required), revisit the Windows Update settings to ensure that your system is up to date.
It’s important to keep your Windows operating system up to date to benefit from the latest features, security patches, and bug fixes. Windows Update regularly provides these updates to enhance the performance and security of your computer.
If you can’t update your Windows OS automatically then you are recommended to update your OS manually. Visit the official site and search for the latest update; download and install the update.
Method 3: Run Windows Troubleshooter
Another way to fix the error is to run the Windows Troubleshooter, you can follow these steps:
1. Open the Start menu and click on the Settings.
2. In the Settings window, select Update & Security.
3. In the Update & Security, click on the Troubleshoot.
Scroll down and find the category that best matches the issue you’re experiencing.
4. Click on the troubleshooter you want to run, and then click on the Run the troubleshooter button.
The troubleshooter will now attempt to detect and resolve the issue. Follow the on-screen instructions and provide any necessary information.
After the troubleshooter completes its process, it will display a summary of the detected problems and any solutions it has applied.
If the troubleshooter was able to resolve the issue, close the troubleshooter and check if the problem is resolved. If not, you may need to explore other methods given.
Method 4: Repair and Reset Microsoft Store
If the error code still persists then you will repair and reset Microsoft. Here’s how:
Repair Microsoft Store Apps:
1. Open the Start menu and click on Settings.
2. In the Settings window, select Apps.
3. In the Apps & Features, locate the Microsoft Store app.
4. Click on the app and select Advanced options.
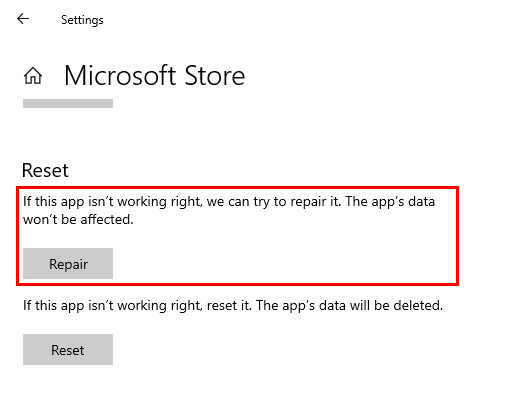
5. In the Advanced options, scroll down and click on Repair.
Follow any on-screen prompts or instructions that appear during the repair process. Once the repair is complete, restart your computer and check if the app is functioning properly.
Reset Microsoft Store Apps:
1. Open the Start menu and click on Settings.
2. In the Settings window, select Apps.
3. In the Apps & Features, locate the Microsoft Store app.
4. Click on the app and select Advanced options.
5. In the Advanced options, scroll down and click on the Reset button.
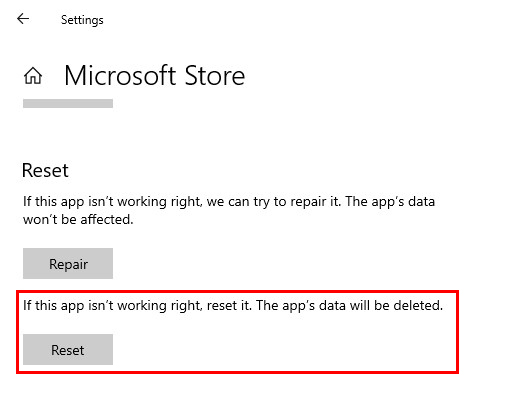
6. A confirmation dialog will appear. Click Reset again to confirm.
The app will be reset to its default settings, removing any customizations or data associated with it.
Restart your computer and launch the Microsoft Store app or the reset app to see if the issue has been resolved.
Method 5: Repair System Files with CMD
Let’s repair system files to fix 0x80072f8f. Follow these steps:
1. Open CMD (Command Prompt) from the Start menu.
Don’t forget to run the CMD as administrator.
2. To run the System File Checker (SFC), type the following and press Enter:
SFC /scannowThe SFC command will scan your system files for any issues and attempt to repair them. This process may take some time. Once it completes, it will display the results of the scan.
3. Now you will run the Deployment Image Servicing and Management (DISM) to check the health of the image, type the following and press Enter:
Dism /Online /Cleanup-Image /CheckHealthThe DISM command will check the health of your Windows image and report any problems it finds.
4. Finally, if any issues were found during the previous step, you can use the following command to restore the health of the image:
Dism /Online /Cleanup-Image /RestoreHealthThe DISM command will download and replace any corrupt or missing files from Windows Update or from a specified source.
Allow the DISM command to complete the process, which may take some time depending on your system’s health and internet connection.
Running these commands can help diagnose and repair issues with system files on your Windows 10 or 11.
Method 6: Disable Firewall Temporarily
And last option is to disable the firewall temporarily. Like mentioned above, there is a slight possibility that the error is caused by a firewall. Disable it temporarily and your issue will be fixed. To temporarily disable the firewall on Windows, you can follow these steps:
1. Open the Start menu and click on the Settings.
2. In the Settings window, select Update & Security.
3. In the Update & Security, click on Windows Security.
4. In the Windows Security window, click on Firewall & network protection.
5. Under the Firewall & network protection, you will see your active network profiles (such as Domain, Private, and Public).
6. Click on the network profile for which you want to disable the firewall. For example, if you’re using a home network, click on “Private network.”
7. In the next window, you will see the firewall settings for that network profile. Toggle the switch to Off to disable the firewall temporarily.
Please note that disabling the firewall temporarily can leave your computer more vulnerable to network threats. It is recommended to only disable the firewall temporarily for troubleshooting 0x80072f8f. Remember to re-enable the firewall as soon as you have fixed the issue.

