How to Install XCode on Windows 10?
If you are a developer or someone who is learning iOS development, then you know how handy Xcode is. For those who don’t know about XCode; XCode is a developing application by Apple. It is used to develop applications for macOS.
For iOS development, XCode is a great SDK (software developing tool). XCode has all the software development tools required for developing iOS.
Table of Contents
XCode
XCode is an IDE (integrated development environment) with numerous built-in development tools. It can be used as an interface builder, for testing iOS and has an asset management toolkit.
Related Topic: Free Download and Install Arduino IDE on Windows 10
Features of XCode
Assistant Editor- can be used as assistant editor as it can show primary work documents and current files at a time.
Interface Builder- within few clicks, you can create a wonderful and eye-catching interface design prototype for your project.
Jump Bar- is a feature that is present on the top pane of your IDE and when used; it opens a mini search bar. The search bar helps to browser information.
Source Control- it helps to check all the changes made to the source code.
The only problem is that XCode is not available on Windows OS. there is no version of Windows that is compatible with XCode, the app is available only on iOS or macOS.
There are tools as Swift that can do the development, however; it is not as good as XCode. Tools like MacStadium, MacinCloud, XcodeClub are also there for remote access to Mac. Still, they are what we want. third party tools as React Native or Xamarin are also options, still, there is a lack of customization, compatibility, and debugging issues.
After searching for hours and trying all the possible ways, there is only one way to install and use XCode on Windows 10, which is virtualization.
Requirement
Your system should be strong enough to run both your Host OS and macOS (as a guest) at a time. For this purpose, you will need a system with 4 GB (try to use at least 8 GB) of RAM. For storage, 500+ GB is required in case you won’t experience a storage shortage.
The processor should be Intel Core 2 Quad or better, and Apple ID is also required. As you will download the XCode from Apple Store. Virtualization feature should be also enabled in your BIOS.
How to Install XCode on Windows 10?
To perform the installation, you will need to follow these steps one by one.
1- Download and Install VirtualBox
The first step will be to download and install VirtualBox on your Windows 10. Here you can download VirtualBox for your Windows 10. If you don’t like VirtualBox, then you can also download VMware Workstation too. these two are the best options for virtualization, chose one of them from the links.
Once downloaded, open the setup file and follow the instruction given by the app.
Since the installation is easy, we have left that part for you. When you installed the VirtualBox, then continue to the next step.
2- Install macOS on VMware or VirtualBox
Here you will need to install macOS on your virtualization software. It can be any version of macOS. Here are some links, where you can download the macOS ISO files for this purpose.
- macOS Monterey ISO File
- macOS Big Sur ISO File
- macOS Catalina ISO File
- macOS Mojave ISO File
- macOS Sierra or High Sierra ISO File
Once downloaded then you will install them on your virtual machine. We have installed macOS Big Sur on VMware Workstation, however, you can install macOS Catalina or macOS Mojave on VMware Workstation or VirtualBox too.
3- Download XCode
When you have installed macOS on Windows 10, then you will run the macOS. Inside the macOS, you will open Apple App Store by opening Safari.
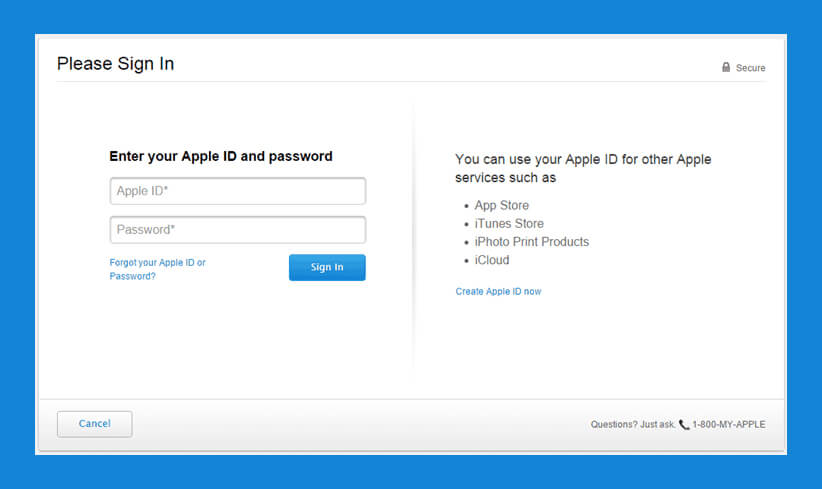
Then you will search for XCode and download it. For downloading XCode, you will need to Sign in with your Apple ID. Sign in, then download and install XCode.
4- Install XCode
Clicking on the download will start the download. When the downloading is completed, the installation button will appear. Install the app, as it is effortless.
Run XCode and it will ask for your permission. Insert your account password and use the app. Having access to the account of your macOS will not only modify by will also enable lots of other privileges too.