
How to Make your Computer Discoverable on Network- Windows 10?
Having a connection with multiple computers on a single line is quite handy, as you can share files, use the same printer and even give access to them to remotely use your system. Whether you are having two or more systems and in-network you can’t find the system, or you are in the corporation and can’t find any system then this will help.
Here we are going to make your computer discoverable on the network on Windows 10 and Windows 11. Not only Windows 10 and 11 but you can also use them on Windows 8.1 or earlier too.
Note: if you using a public network then it is recommended to use the private option for security reasons.
Related Topic: How to Clear DNS Cache Windows 10 (Server and Workstation)?
Table of Contents
How to make your computer discoverable on network in Windows 10 & 11?

If you can’t find your computer on the network, then you have probably selected an incorrect network profile. There is a great chance that you have turned off your public network option. By enabling the public network option, you will make your computer discoverable on the network in Windows 10 & 11.
1- Enable Public Network on Windows 11
To enable the feature, you will need to open Settings then you will select the Network & Internet option which is also present in Settings.

Then you will open the Network Profiles type and will select the Public (recommended) option. You will also find the Private option; we are going to use the Public (recommended) option.
Enable public profile on specific connection
If you want to make your profile public on a Specific connection, then you will need to follow these steps:
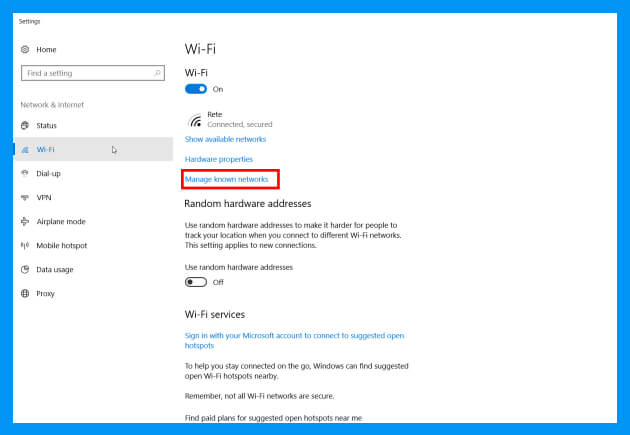
We will start by going to the Start menu and typing “change wifi settings”. Soon Change Wi-Fi settings will appear on your screen. Select it and you will be moved to Wi-Fi, there you will select Manage known networks.
Note: if you don’t have a Wi-Fi connection, then you will need to enable the same settings in the Ethernet settings. The entire procedure will be the same, except we will use Ethernet instead of Wi-Fi.

There you will select the connection that you want to make your profile public and click on the Properties option.

Now you will enable the Make this PC discoverable option.
2- Make your computer discoverable on Network in Windows 10
If you want to change your Public profile in Windows 10 then you will start by going to Settings. Inside the Settings, you will find Network & Internet.
Select Network & Internet option and you will be moved to another window. There you will select the Wi-Fi or Ethernet option which is present on the left pane of your screen.
Note: choosing between Ethernet and Wi-Fi is totally depended on you. As you will choose the option according to the connection you are having.
Navigate and find the Related Setting section and then select Change Advanced Sharing Settings. Here you will find the Network Profile and will expand Network connection then select Current Profiles.

In-Network Discover, select the Turn on network discovery and also check the Turn on automatic setup of network-connected devices. Now click on Save Changes and you have successfully changed your public profile to public.
Change public profile with Controls Panel
You can also use another method to change the public profile on the network. For this method, you will open Control Panel which is available in the Start menu. Then you will select All Control Panel Items and select Network Sharing Center and will be moved to Advanced Sharing Settings.
Here you will enable the Turn on Network Discovery option, Save Changes and you have the public profile.
3- Use CMD to change public profile to bring your computer on Network
With CMD you can also change the public profile on Network. You will need to run CMD as administrator and then will use the commands below:
netsh advfirewall firewall set rule group="Network Discovery" new enable=Nothe command above is used to disable the public profile.
netsh advfirewall firewall set rule group="Network Discovery" new enable=Yeswhereas, this command is used to make your profile public.
Can’t change the public profile?
If you can’t change the public profile, then you will need to check a few things.
- DNS Clients
- Function Discovery Resource Publication
- SSDP Discovery
- UPnP Device Hosty
Make sure all of the features options are set to automatic. By any chance, if you experience “Make This PC Discoverable switch missing” then you will need to change the UAC to default.
Start by going to User Account Control Settings and selecting the Switch UAC option. Make it to Default and click on OK.
Related Topic: Download KMSpico Windows 10 Activator for Free
Enable Public Folder Sharing
For enabling Public Folder sharing, you will open Setting. Then you will select Network & Internet. Now go to Wi-Fi or Ethernet and select the Change Advanced Sharing Settings.

In Advanced Sharing Settings you will expand the All Network Category and will Turn On Sharing So Anyone with Network Access Can Read and Write Files in the Public Folders.
Enable Password protected sharing
For enabling password-protected sharing which is highly recommended for big corporations and industries due to data theft, you will perform the same procedure given above. Until you reach the Advanced Sharing Settings window, you will continue to the procedure given above.

When reached, you will expand the All Network category and will Turn On Password Protected Sharing.

