![How to Take A Screenshot on Windows 11? [Quick & Easy]](https://www.softrar.com/wp-content/uploads/2023/02/how-to-take-screenshot-on-Windows-11.jpg)
How to Disk Defragment Your Windows 10
Are you having slow Windows? Well by perfuming disk defragmentation, you can improve your system’s performance. We have also mentioned methods to improve your PC performance. One thing that you will find while checking the article, you will find that by using Disk Defragment on your Windows, your system performance will improve.
So, what is disk defragment and why should I use it? Is it a good idea to defrag on SSD drives too? These are great questions that had popped into your mind, and we will answer them all. Let’s start with:
Table of Contents
What is Disk Defragmenter?
While installing Windows and other applications, numerous files are saved on your disk. No matter whether you uninstall your programs or not, still, the files and folders will be dispersed within time. The data blocks (fragments) will be all over your disk.
Using a disk defragmenter, you will collect and organize all your data blocks. This process of collecting and organizing data blocks is called Fragmentation.
By performing the fragmentation on Windows, you will not speed up your PC but will also improve the access to fetch data.
You can also perform the exact same process on external drives too. For that you will insert your drive, then will visit the Disk Defragmenter and will defrag the external drive.
Related Topic: How to Transfer Data from One SSD to Another on Windows
Disk Defragmenter on Windows (XP, Vista, 8, 10, and 11)
You will find the process exactly the same on all Windows. From Windows XP to Windows 11, all the steps are totally the same. Minor changes like the name of options can be found, but the process is totally the same.
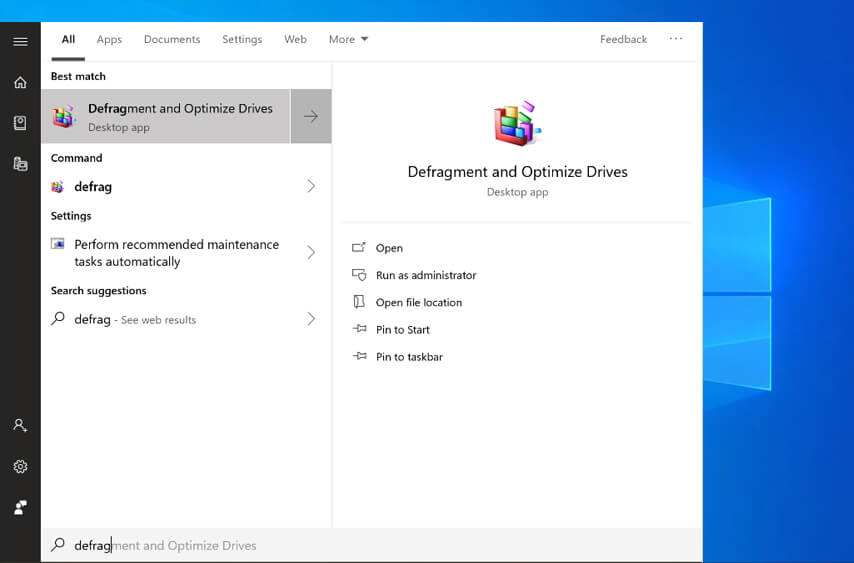
Begin by going to Start menu and there you will type “defragment”. Now you will see Defragment and Optimize Your Drives will appear on Start.
Select the Defragment and Optimize Your Drives and you will be placed in Optimized Drive.
NOTE: if you can’t find any of your drive in Optimized Drive window, then you will check the drives properties. As Defragment and Optimize can only defrag drives with NTFS file systems. the exFAT system is not supported by the application and needs to be changed.
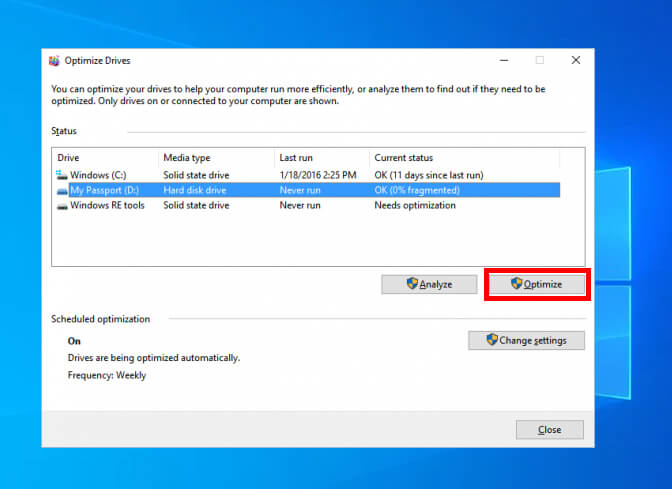
Here you will select the drive that you want to defrag and then click on Optimize.
NOTE: make sure that you are performing the defragmentation on Hard Disk. Defragmentation on SDD will not only damage it but will also run the TRIM command. You might experience some speed improvement, but you are not recommended to do it. It is recommended to avoid the defragmentation for SDD.
While the process takes place, you will find a percentage indicator in Current Status.
Once the defragmentation process got completed, you will find something like “OK (*% fragmented)”.
Congratulation! You have successfully defragmented your drive. If you want to perform the process automatically then you can use the Scheduled Optimization option. This option will enable you to defrag your drives at certain times (date & time that you have selected).
Defrag your drive with CMD
For performing defrag on CMD, you will open CMD from Start. There you right-click on CMD and select Run as administrator. Remember that running CMD with admin privileges, you might encounter errors or restrictions.
Now you will use the command below to defrag your drive. Since, we are performing defrag on C drive, so we have used “C:”. however; if you want to perform something with other drives then you can replace it with the disk’s letter.
defrag C:Related Topic: How to Make Laptop Faster on Windows?
Enable Scheduled Defragmentation
This feature will enable you to defrag your system’s disks time by time. You don’t need to manually defrag your drives, as this will do that for you. For this feature, you will open the Start menu and open Defragment and Optimize Your Drives.
In Optimize Drive, you will select Change Settings.

Now you are in the Optimization schedule window. Here you will check the Run on a schedule (recommended) and then you will check Increase task priority, if three consecutive scheduled run are missing.
In Frequency, you will be provided with the options of when the defragmentation will be applied. You are going to choose between Daily, Weekly or Monthly.
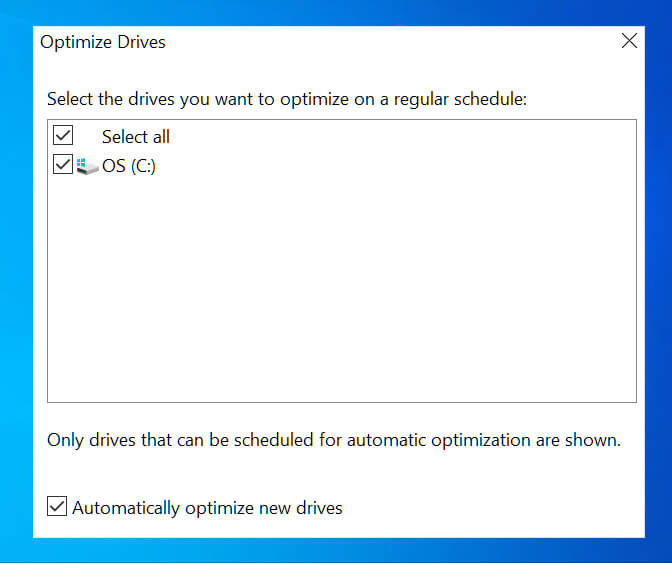
Here you will select Choose and in the new window, you will select the disks that you want. You can either select them all or select the one that you think is important.
TIP: there are Automatically optimized new drives; enabling this feature will defrag all the newly inserted drives.
Click on OK to apply and then click on OK.
Related Topic: How to install Windows on New SSD Storage?
What happened when I stop defragmentation process?
While you are performing the defragmentation on your Windows 10, what will happen when you stop it between. Well, the answer to that will be nothing. There won’t be any sort of damage done to your disk at all. However; it is not recommended to stop the process, as you have already spent your time on it. Give it some more time and you will have a drive fully defragmented.
What is the best disk defragmenter for Windows 10 or 11?
You will find different disk defragmenters for your Windows. There is one provided by CC cleaner, another by AVAST, and many more. However; the most recommended one is the built-in one. On installing any Windows on your PC, you will also install a disk defragmenter too.
Using this built-in app for this purpose. As this is the one is already installed, there is no need for additional download. And last, the application is greatly integrated with Windows System files. by using this application, you will be able to defragment Windows System files as compared to other tools.
How to reinstall the disk defragmenter on Windows?
Since the application comes as built-in, you won’t need to install or remove it. By just restarting or resetting from the Settings, it will work as new. And for resetting, you are going to open Services from the Start menu. Open the Start menu and search for services. Select services and find Disk Defragmenter.
Right-click on this service and disable it. Again, right-click on the service and Start it. Now give your system a restart and your Disk Defragmenter is now running with any issue.
How to fix disk defragmenter issues?
What if you are having issues with the defragmenter? Well to fix the error, you are going to open the CMD from Start. Right-click on CMD and use the command below:
sfc/scannowThis command above will scan the entire C drive and all the possible errors or issue with it. Any sort of corrupt system files, or damaged files will be displayed on your screen which can be later fixed.
How many passes does the disk defragmenter do Windows 10?
The phases of the fragmentation can totally depend on your disk size and the number of files inside it. Mostly with average disk sizes, it will take around 5-10 times. However; disks that are large in size and has lots of files, they might take more.
Is there a disk defragmenter for Windows 10?
There are both built-in and third-party disk defragmenters for Windows 10. There is a built-in app called “Disk Defragmenter” and there are also numerous other options. The third-party applications are provided by popular brands as CC Cleaner, Avast and much more.

