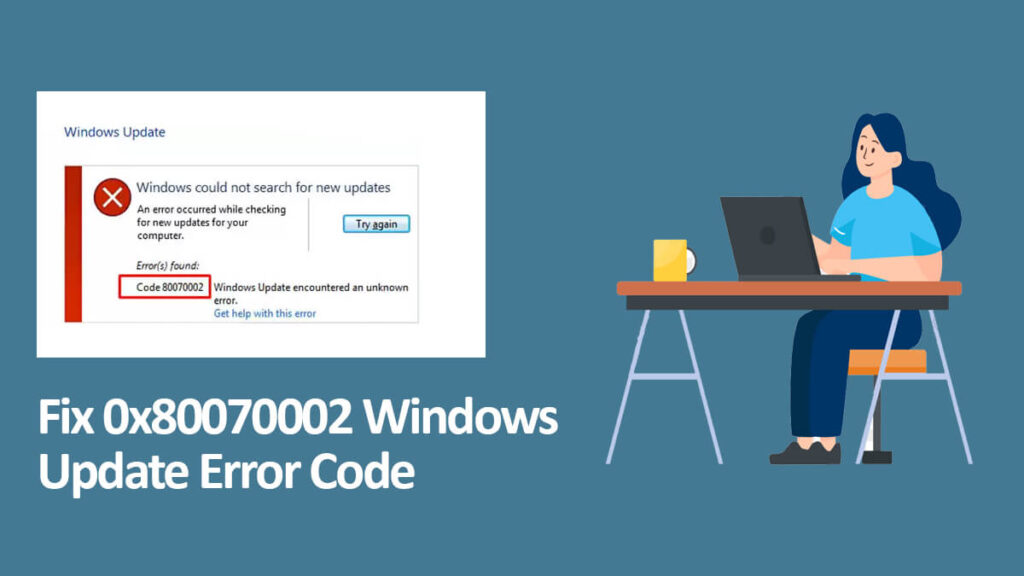
How to fix Error Code 0x80070002 in Windows Update?
Error code 0x80070002 aka 8007002 is an error that appears on different Windows OS including Windows XP, 7, 8, 10, and even Windows 11. To fix the error, you are going to use the methods provided in this article.
Table of Contents
Windows Update Error 0x80070002
Why am I experiencing the Windows 0x80070002 error? Well, there is a chance that you have corrupt system files on your PC. Or while performing Windows Update, during the extraction either you have stopped the update, or the files are not extracted fully. This can also cause the error.
Fix Windows Update 0x80070002 Error Code
No matter what the reason is, you are going to fix the error, and that is for sure.
1- Update your Windows
The first and most simple method is performing any update on your system. As we mentioned earlier, if all the Windows Update files are not extracted then you might experience the 0x80070002 error.

Begin by going to Settings > Update & Security > Troubleshooter. There you will find View Additional troubleshooter and select Windows Update.

Inside the Windows Update, you are going to perform the installation of all the updates there.
Your system will update and after updating you will need to reboot. Check again for errors on your system, if found then you will continue to the next method.
2- Uninstall all recent update files
The second method to fix Windows Update 0x80070002 error is to uninstall any recently installed Windows update. You heard it right, while not updating your Windows can cause the error, not updating will also cause the error.
For this method, you will open Control Panel and then select Uninstall a program. Navigate and find any recently installed Windows updates. Right-click on the update and uninstall it.
Give your system a restart and check again for the error.
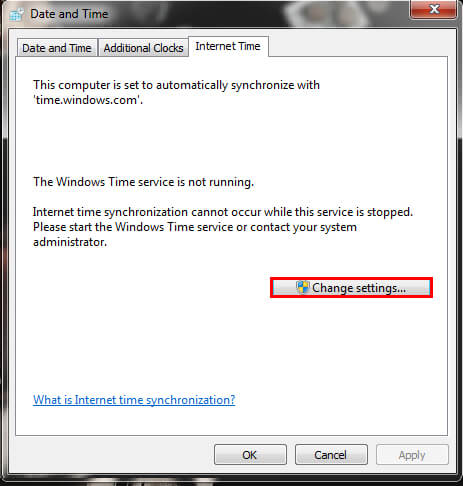
3- Check for the Date and time
You will be surprised to hear that if you got your date and time of your system wrong then you will get the error. Here you will need to just change your date and time accordingly and you have fixed the issue.

Begin by clicking on the Date and Time on your screen. Then you will select Change date and time settings.
You will select change the date and time here; after you changed the date and time then click on OK.
Note: you can also change your time by selecting the Change Time zone option. Select the location and click on OK.
Users are also recommended to connect their system to the internet for date and time. As this will help them to automatically change the date and time from the internet.

To enable the internet time, you are going to the Internet Time tab in Change Date and Time. Then you will select Change Settings > Synchronize with an Internet time server option, select Update now and click on OK.
Once the previous window will be closed; click on OK.
If you are someone who wants to perform the same with CMD then you will need to run CMD as administrator. Running CMD without admin privileges won’t be able to change the settings.
Now type “CMD,w32tm/resync” in the CMD and press Enter. This way, you will sync your date and time to the internet automatically.
4- Delete Software Distribution Folder
Another method to fix the error is by restarting Windows Update services and deleting the SoftwareDistribution folder. We are going to perform both tasks together in this method.
Stop Windows Update Services
Go to the Start menu and open RUN. Inside the RUN, you are going to type “services.msc” and press Enter.

Now you are inside the Services window, you will navigate and find Windows Update.
NOTE: Users who are using Windows XP will need to find Automatic Updates.
Right-click on Windows Update and go to properties. Here you will find Startup type and change it to Automatic. While performing this, you will need to make that the Service status of Windows Update is Stopped.
If you find it running then you will stop it and then change the Startup type.
Delete SoftwareDistribution folder

Now go to This PC > C: drive. Inside the C: drive you will find the Windows folder; open the Windows folder and you will find SoftwareDistribution. You are going to delete this folder.
Enable Windows Update
Open Run from the Start menu again. Type “services.msc” in RUN and press Enter.
You are in the Services window again, you will find Windows Update (for Windows XP users, they will find Automatic Updates). Change the Startup type to Automatic; select Apply and then click on OK.
5- Use Windows Troubleshooter
This one is a handy method where you will download the Windows Troubleshooter file. Then run the file and it will check for any error on your system. After finding the error, the file/tool is going to fix them automatically.
Since the Windows Troubleshooter is a tool from Microsoft then you can use it without any concern. There won’t be any threat that can harm your system.
And unlike other third-party tools, there won’t be any data theft too. You are going to download Windows Troubleshooter from this link. Then you will double-click on it to run.
Since the tool doesn’t require any installation, you will run the tool directly. Wait for the tool to check for system compatibility, then you will select options where you are experiencing the error.

After the checking got completed then you will select Apply this fix and the error will be fixed.
6- Modify Registry files
In this method, you are going to fix some of the registry files that might be corrupt. Instead of deleting anything or moving, we are going to add some new values to our registry files.
So, begin by opening RUN and type “regedit” then press Enter.
Now you will navigate and find the path below:
HKEY_LOCAL_MACHINE\SOFTWARE\Microsoft\Windows\CurrentVersion\WindowsUpdate\OSUpgrade.Once you found the OSUpgrade, you will right-click on the background and select New. Now select the DWORD (32-bit) Value.
Select the newly created value and right-click; select Modify.
Here you are going to change the properties to the following:
Valuename: AllowOSUpgrade
Valuedata: 1
Base: Hexadecimal
After changing the value, you are going to click on OK.
7- Repair Hard Drive
If you are experiencing the Windows Update 0x80070002 error code even now, then you are going to check your hard drive. Maybe there are some corrupt or missing files that need to be fixed. For fixing the hard drive, you are going to run CMD as administrator.
Now type the command below on your CMD and press Enter.
chkdsk/f C:the command above will check for any corrupt or missing files on your system. After the loading got completed, you are going to use this command:
DISM.exe /Online /Cleanup-image /Restorehealth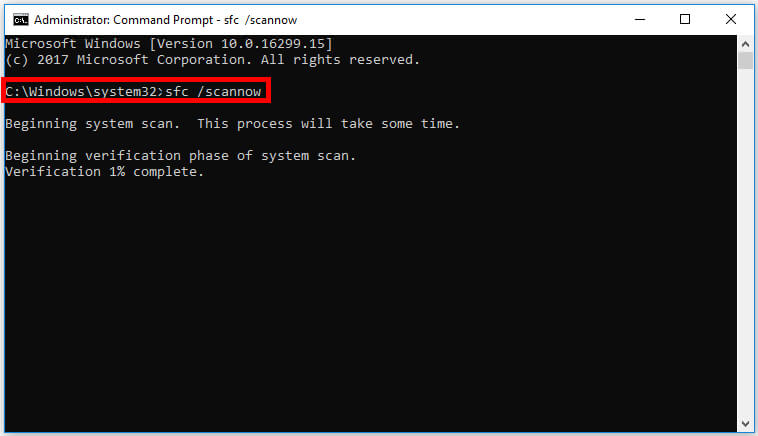
And then use this command:
Sfc / scannowAfter the operation got completed, you are going to restart your system and check for the error again. If you are still experiencing the error, then you will need to use this last method.
8- Disable proxy or third-party applications
Sometimes, it’s third-party applications like anti-virus or anti-malware that cause the issue. Here you will disable your antivirus or related application temporarily. Then you will check for the error, if found then you will find any VPN or proxy applications.
Disable them for a while and check again for the error. These two are also reasons why you have a 0x80070002 error on your system. By temporarily disabling them, you will avoid the error.
Why am I experiencing 0x80070002?
Windows Update 0x80070002 or 80070002 (on Windows XP) are due to corrupt or damaged files. Even updated files can cause the error. By fixing the damaged files and installing a windows update, you will be able to fix the error.
Fix feature update to Windows 10, version 1803 – error 0x80070002

Before we continue any further, you should know that the 0x80070002 error is not related to Windows 10 Version 1803. In fact, you will find the exact same error on Windows XP, Windows 7, Windows 8.1, Windows 10, and Windows 11.
If you are experiencing the error then you will need to find and fix the error file or use one of the methods given above. There is absolutely no relation between Windows 10 version 1803 update and 0x80070002.

