User Account Does Not Have Permission to Open Attachment

Was using Hyper-V when “An error occurred while attempting to start the selected virtual machine(s).” on my screen. Soon this changed to “Account does not have permission to open the attachment ”. Error: ‘General access denied error (0x80070005)”. The
Fix “User Account Does Not Have Permission to Open Attachment”

To fix the error code, you will need to grant access Hyper-V to share files or folders on network. For this, you will need to enable CIFS and delegation in Hyper-V. so, here is what we are going to do.
Related Topic: How to Install WSL (Windows Subsystem for Linux) on Windows
1- Grant access to Network Shared Folders
Begin by selecting Network Shared folders. Right-click on it and select Properties.
Then you will click on Edit which is right under the Security tab.
Continue along by clicking on Add then on Object Types. A checkbox right beside the Computer will be there, check it and click on OK.
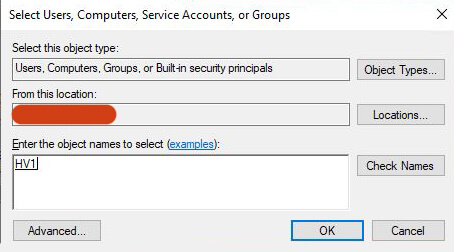
Here you will type the Hyper-V machine name, and authorize folder by clicking on Check Names and clicking on OK.
NOTE: The checkbox beside the Computer is to for finding the Hyper-V machine. If you haven’t checked the option then you are recommended to check Computer in Object Types, as without this the Hyper-V machine can’t be found by the System.
2- Enable CIFS on Hyper-V
Here in this step, you are going to enable CIFS. CIFS delegation gives the admin all the rights or accesses the admin wants. Basically, CIFS is the one that limits the authority and makes the applications work on the user’s behalf.
Go to Server Manager, and click on Active Directory User and Computers. You will find it in Tools. Exact same thing can be performed by opening Windows Run, then you are going to type “dsa.msc” and it will open Active Directory User and Computers
The command above has opened Active Directory Users and Computers, now you will expand the domain and then expand the Computers folder.
On the right pane of your screen, you will right-click on the Hyper-V Machine name and select Properties.
In the Delegation tab, you will select Trust this computer for delegation to specified services only and Use any authentication protocol.
Click on Add, then you will open Add Services.

Select Users or Computers in Add Service.
Type the name of where the network share is located, validate it by clicking on Check Name, and then click on OK.
Select CIFS services for the file sharing services and click on OK. Now this one will enable the CIFS delegation on Hyper-V that we have talked about earlier. And that is it, now you are able to install any OS on your Hyper-V.