NVIDIA GeForce Experience Error Code 0x0001 Fixed
Nvidia GeForce Experience is a great way to make the best out of your Nvidia graphic card. The application will enable you to increase, and decrease the power and bring changes to other sections. However; if you experience the error code 0x0001 on Nvidia GeForce Experience then it means that you can’t even open the application.
If you can’t start the application then you can’t change the settings or use it at all. All you experience is:
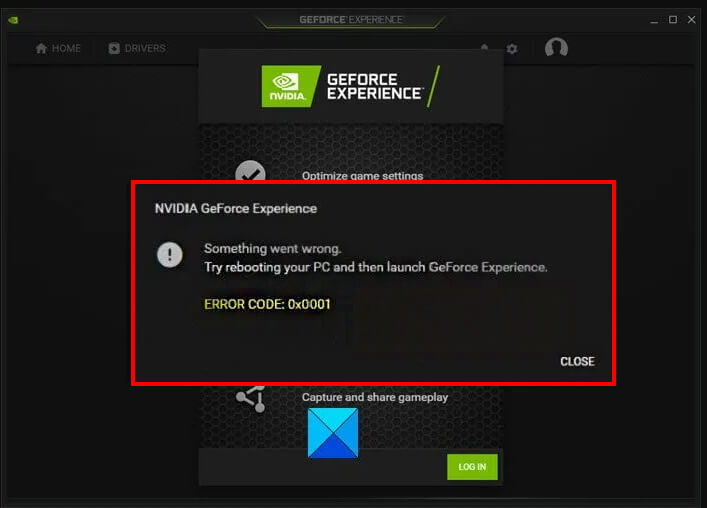
Something went wrong, Try rebooting your PC and then launch GeForce Experience, ERROR CODE: 0x0001.Without the application, you are not able to use the features inside the application. You won’t be able to optimize games or update Nvidia graphic drivers. The possibility of reinstalling or changing container services is out of question too.
And here we are going to fix Nvidia GeForce Experience Error Code 0x0001.
Table of Contents
Reasons for Error Code 0x0001
So, why are you experiencing a 0x0001 error at all? Well to answer that, you will need to know that, if you are experiencing the error then you don’t need to be worried. As the error is simple and can be fixed easily. Here is why you are experiencing the error on your system.
- There is the possibility that your files are either outdated or corrupted.
- Nvidia Container Service might have issues that causes it to stop the interaction with the Local account.
- You are using the beta version of Nvidia GeForce Experience and there are still bugs to be fixed.
- We can’t ignore that the application can’t run due to poor compatibility with your system.
How to fix Nvidia GeForce Experience Error Code 0x0001?

Now that we know what causes the error 0x0001, let’s fix them. Before we apply any of the methods given, you are recommended to give your system a reboot. Even after restarting your system, if you are experiencing the error then you apply the first method.
1- Change Container Services
For this method, you are going to open RUN from the Start menu. Then you are going to type “services.msc” and press Enter. This command will open Services on your Windows.
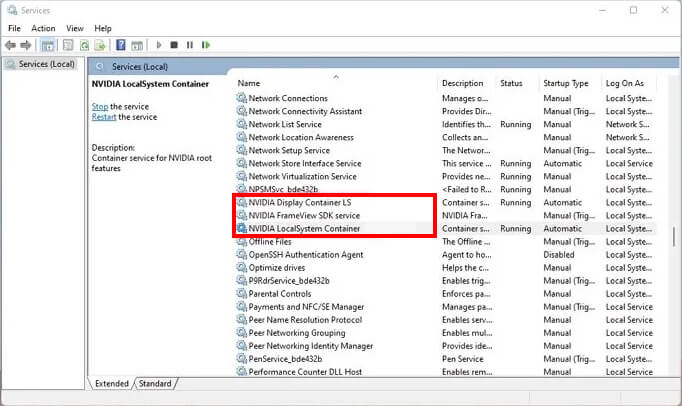
Now you are going to navigate and find Container Services.
Select Container Services, right-click on it, and select Properties.
Select the Log on tab, and in Log on tab, you are going to find the Local System Account. Check this option and then enable Allow service to interact with desktop by checking the box beside.
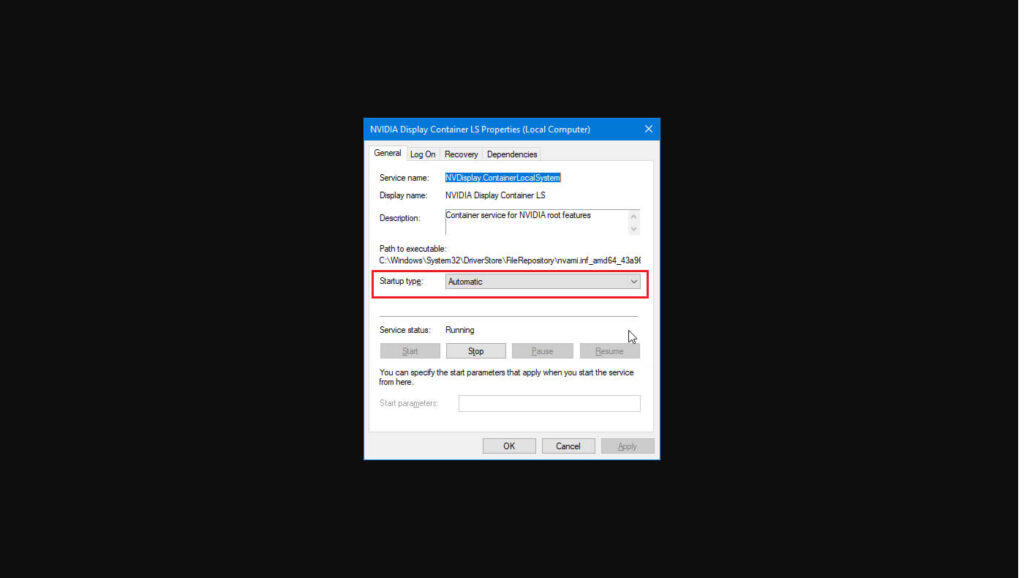
Here you will click on Apply and then click on OK.
Check for errors by running Nvidia GeForce Experience on your system. If you are still experiencing the error then you are recommended to Service and find the services below:
- NVIDIA Display Container LS – Automatic
- NVIDIA NetworkService Container – Manual
- NVIDIA LocalSystem Container – Automatic
- NVIDIA LocalSystem Container – Automatic
- NVIDIA GeForce Experience Service – Automatic (Delayed Start)
- NVIDIA Geforce Experience Backend Service – Automatic (Delayed Start)
- NVIDIA Telemetry Container service – Automatic
As mentioned above, you are going to change their options. While you will start them and change their settings to Automatic, on other hand you will change others to Delayed Start.
2- Update all your GeForce Drivers
If your drivers are outdated then use this method to update them. For this method, you can’t use the automatic option. You are going to download all the drivers manually. Visit the GeForce download page and download the drivers.
Make sure that you have downloaded the latest version of the driver.
You are going to search for drivers manually. Then you will select the exact GPU and operating system. Hit on the Search button and you will have the list.
Scroll down and select the driver, and download it. Once downloaded then you will double-click on it to start the installation.
NOTE: While other recommends using the beta version. If you experiencing error code 0x0001 with the latest version is also possible. So, we won’t recommend you to use beta versions, as beta versions still have bugs to be fixed within. Instead, you can apply the last method given.
3- Use Display Driver Uninstaller
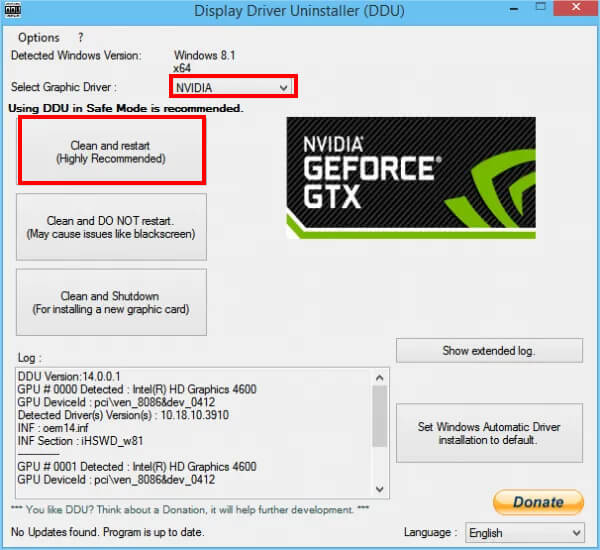
Here in this method, you will clean everything with Display Driver Uninstaller. You are going to download Display Driver Uninstaller (DDU) for your Windows. once downloaded then you are going to install it.
After the installation, you will run DDU and check for drivers on your system. You will scan and find all Nvidia drivers.
For this, you will select Device then you will choose options such as GPU and NVIDIA.
Next, you will select the Clean and restart option. This feature will delete all NVIDIA-related drivers from your system.
When all the drivers are removed then you will visit the official site of Nvidia. Download all the drivers required and then install them.
4- Fix values in Registry
Sometimes there are values of backslashes missing in registries. By adding the missing values in the registry, you will be able to fix Nvidia GeForce Experience Error Code 0x0001. So, lets start to fix the missing address path in the registry.
Begin by opening RUN from the Start menu or pressing Windows+R.
Then you will type “regedit” and press Enter.

Navigate and find the “Computer\HKEY_LOCAL_MACHINE\SOFTWARE\Microsoft\Windows\CurrentVersion” in the registry editor. Once found you will double-click on it to open it.
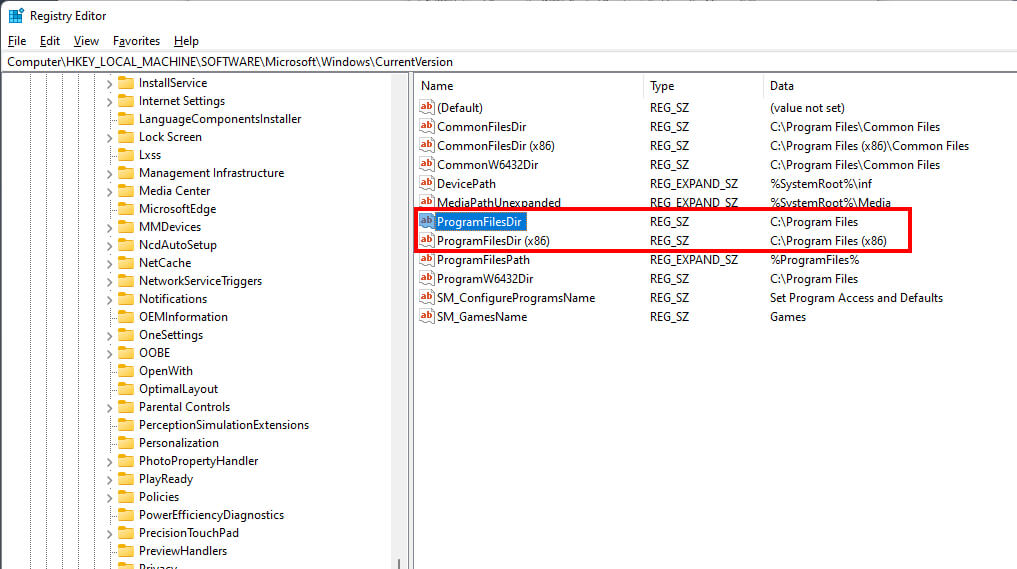
Here you will find ProgramFilesDir and ProgramFilesDir (x86) entries on the right side of your registry editor.
Make sure the entries path are the same as “C:\Program Files” and “C:\Program Files (x86)”. No slash or commas should be missing. If you found any sort of character missing in the path then you are recommended to fix it.
Wait for the changes to be made and then click on OK.
5- Reinstall Nvidia GeForce Experience
And the method to fix Nvidia GeForce Experience error code 0x0001 is to reinstall the application. Instead of uninstalling it from Settings, try to use a third-party application as IObit uninstaller. This will help you to uninstall the application and remove all the residue files too.
Use the application to uninstall Nvidia GeForce Experience from your system. Once the application is removed then you will visit the official site of Nvidia. There you will download the latest version of GeForce Experience and then install it on your system.