
Repair VHD File Format in the Most Efficient Way
Have you ever experienced the frustration of trying to access your virtual hard disk (VHD) files, only to be met with error messages or the inability to open the file? If so, you know firsthand how stressful and time-consuming dealing with VHD file issues can be.
VHD files are an essential component of virtualization technology and are used by businesses and individuals worldwide to store critical data. However, like any other file type, VHD files can become corrupted or damaged, or leading to data loss.
In this article, we will discuss the importance of VHD files, the common causes of VHD file corruption, and most importantly, how to repair VHD files efficiently. So, whether you’re dealing with a minor VHD file issue or a severe data loss situation, read on to learn how to fix your VHD file and retrieve your important data.
Table of Contents
What causes VHD files to get corrupted or damaged?
There are several reasons why a VHD file may become corrupted or damaged, leading to data loss and file inaccessibility. Here are some of the most common causes of VHD file corruption:
- Any physical damage to the hard disk, such as bad sectors, faulty RAM, or a failing power supply, can cause VHD files to become corrupted.
- Malicious software can damage or corrupt VHD files, making them inaccessible to users.
- Power failures or sudden system shutdowns can cause VHD to file corruption or data loss.
- Any conflicts between virtualization software and operating system or other software can cause VHD file issues.
- Accidentally deleting, formatting, or modifying VHD files or volumes can lead to file corruption or data loss.
- VHD files may become corrupted due to file system errors, such as incorrect disk allocation, directory errors, or cross-linked files.
In addition to the reasons mentioned, there are several other factors that can also cause VHD file corruption or damage. For instance, VHD files that are not closed correctly can become corrupted, especially if they are in use at the time of shutdown.
Additionally, VHD files that are stored on a network drive or external storage device can become corrupted due to network interruptions or physical damage to the storage device.
Another common cause of VHD file corruption is the use of outdated or incompatible virtualization software. Using virtualization software that is not compatible with the operating system or other software installed on the system can cause conflicts and lead to file corruption.
Furthermore, VHD files may become corrupted due to disk fragmentation or a lack of free disk space. Fragmented files are more prone to errors and data loss, which can lead to VHD file corruption.
It is important to note that VHD file corruption can occur gradually over time, and it may take some time before the effects of file corruption become noticeable. Therefore, it is crucial to perform regular file integrity checks and take appropriate measures to prevent VHD file corruption.
How to Repair VHD files on Windows 11?
Virtual Hard Disk (VHD) files have become an essential part of virtualization technology, used widely by businesses and individuals to store important data. However, VHD files are susceptible to corruption, which can result in data loss and downtime. Here are some simple yet efficient ways to fix it:
1- Using the CHKDSK or DISM
Windows 11 comes with built-in tools such as CHKDSK and DISM, which can help repair file system errors that may be causing VHD file corruption.
CHKDSK: CHKDSK (Check Disk) is a built-in Windows 11 tool that checks the file system integrity of a disk and fixes any errors it finds. You can use CHKDSK to fix VHD files that may have file system errors that are causing corruption.
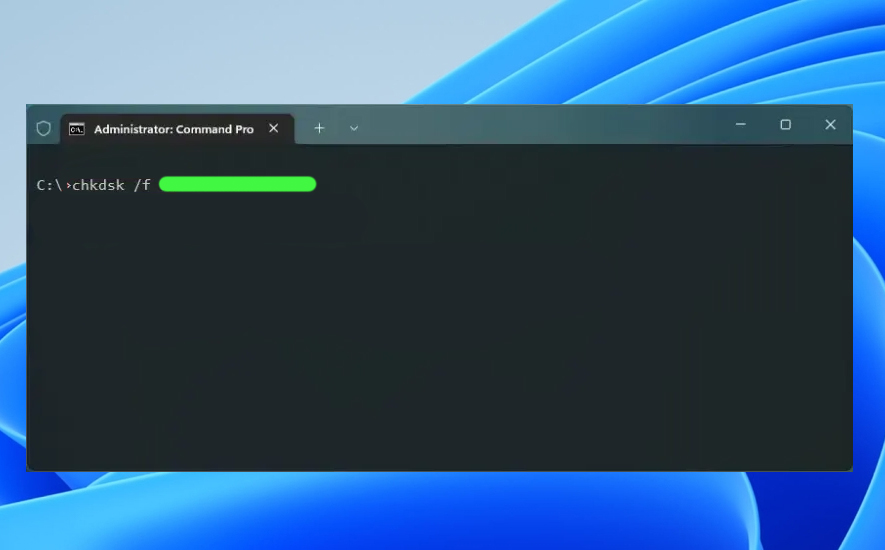
- Open Command Prompt with admin rights by right-clicking on the Start menu and selecting Command Prompt (Admin).
- Type “chkdsk /f <drive_letter>:” (without quotes) in the CMD window, where “<drive_letter>” is the drive letter of the VHD file you want to repair. For example, if the VHD file is on the D drive, type “chkdsk /f D:”.
- Press Enter to execute the command.
- The CHKDSK tool will scan the VHD file for file system errors and fix any errors it finds.
Once the process is complete, exit the PowerShell window and check if the VHD file is repaired.
DISM: DISM (Deployment Image Servicing and Management) is a built-in Windows 11 tool that can repair Windows system files, including virtual hard disk (VHD) files. DISM can fix VHD files that have file system errors that are causing corruption. Here’s how to use DISM to fix a VHD file:
- Open Windows PowerShell / Command Prompt with admin rights by right-clicking on the Start menu and selecting Windows PowerShell (Admin).
- Type “Dism /Online /Cleanup-Image /RestoreHealth /Source:<path_to_install.wim>:<index>” in the PowerShell window. Replace “<path_to_install.wim>” with the path to your Windows installation file, and “<index>” with the index number of the Windows image you want to use.
For example, if the Windows installation file is located in the D drive and the index number of the image is 1, type “Dism /Online /Cleanup-Image /RestoreHealth /Source:D:\sources\install.wim:1”.
- Press Enter to execute the command.
- DISM will download and replace any damaged or corrupted files, including the VHD file.
Once the process is complete, exit the PowerShell window and check if the VHD file is repaired.
2- Using Hyper-V Manager
Hyper-V Manager is a built-in tool in Windows 11 that allows you to manage virtual machines and VHD files. here’s how to use Hyper-V Manager to repair a VHD file:
- Open Hyper-V Manager from the Start menu.
- In the left-hand pane, select the server that has the VHD file you want to repair.
- In the center pane, select the virtual machine that uses the VHD file you want to repair.
- Right-click on the virtual machine and select Settings.
- In the Settings dialog box, select the hard disk that contains the VHD file you want to repair.
- Click on the Edit button to open the Edit Virtual Hard Disk dialog box.
- In the Edit Virtual Hard Disk dialog box, click on the Check button to run a disk check on the VHD file.
- Wait for the disk check to complete. This may take some time.
- If the disk check detects errors, click on the Repair button to repair the errors.
- Wait for the repair process to complete. This may take some time.
- Close all the dialog boxes and check if the VHD file is repaired.
Using Hyper-V Manager is a relatively easy way to repair VHD files as it provides a built-in disk check and repair feature. If the disk check detects errors in the VHD file, the repair feature can fix those errors and restore the VHD file to working order.
3- Use Disk Management
Disk Management is another built-in tool in Windows 11 that can help repair corrupted VHD files. Here is how to use Disk Management to fix a VHD file on Windows 11:
- Open Disk Management.
- Detach the VHD file.
- Attach the VHD file again, selecting Attach a virtual disk later.
- Right-click on the VHD file and select Properties.
- Select the Tools tab.
- Click on Check to run a disk check on the VHD file.
- Click on Repair drive to fix any errors.
- Detach and reattach the VHD file to the virtual machine.
Check to ensure that the VHD file is working correctly.
4- Using third-party software
Using third-party software to repair a VHD file is a great option when built-in Windows tools or Hyper-V Manager fail to fix the file. These software programs are designed specifically for repairing VHD files and can often fix issues that other methods cannot.
There are several third-party software options available for repairing VHD files, such as Stellar Repair for Virtual Machine. These tools are specifically designed for VHD file repair and can help you recover your important data.
To use third-party software to repair a VHD file, you first need to select a reliable and reputable software program. There are many options available, so it’s important to choose one that has a good track record and positive reviews.
Once you’ve downloaded and installed the software, you can open it and select the option to repair a VHD file. From there, you’ll typically need to browse to the location of the VHD file you want to repair and select it, and then follow the prompts to start the repair process.
The software will analyze the VHD file and attempt to fix any errors or issues it detects. Once the repair process is complete, you can usually access the repaired VHD file and check to ensure that it’s working correctly.
5- Backup and Restore VHD file
If you have a backup of the VHD file, you can restore the file to its previous state. To restore the VHD file, go to Settings > Update & Security > Backup, and select Restore files from a current backup. Then, select the VHD file you want to restore and follow the prompts to complete the process.
In conclusion, VHD file corruption can cause significant data loss and productivity downtime. However, with the built-in Windows tools and third-party software options available, repairing VHD files on Windows 11 has become more accessible than ever.

