Download and Install VMware Unlocker For VMware Workstation
Here you can download and install VMware Unlocker for your VMware Workstation. The VMware Unlocker patch tool is completely free to download and use. There is no need for any kind of license or cracks. The app is provided by a convenient source and is free from any kind of threat.
Both the download and installation process is super easy and straight to the point. We have provided both the final(latest) and the previous version of VMware Unlocker for the users. Links for the older versions are given at the bottom of the article, there you can download them.
If you intend to use any macOS on your VMware workstation then while creating the virtual machine you will notice that there is absolutely no option to set macOS. And there is a reason behind that, as macOS is not supported by VMware at all.
It is not like only VMware workstation player that doesn’t support macOS but any version of VMware Workstation like pro or vSphere ESXi doesn’t support macOS.
Table of Contents
What is VMware Unlocker?

Before creating any guest OS on VMware workstation, you will be asked to select the OS version. Surely if you don’t select them, then you won’t be able to create the guest OS. However, due to having no support for the macOS series, the tasks seem like an impossible work to do. Which brings to VMware Unlocker that can do this job for us.
VMware Unlocker is a Patch tool used inside VMware. It was created on CMD command trigger that allows you to use macOS such as Mojave, High Sierra, Yosemite on your VMware Workstation. The patch tools replace some of the VMware program files which can be observed while creating a virtual machine. Other small software also available like VMware-vm.exe, VMware-vmx-debug.exe and VMware-vmx-stats.exe.
Download VMware Unlocker latest version

Since there is a constant update in macOS series, a constant update is also needed. Another version of Unlocker was working well with macOS Mojave until the arrival of macOS Catalina. With new OS like Catalina and the last update provided by Apple on Mojave, VMware started to make a number of errors.
Users were even unable to use Unlocker due to support issues. Which made its developers to release a newer version. Apple is constantly trying to stop the use of macOS on any platform other than the platforms provided by them. Using macOS on any platform out of Apple products is completely against their policies.
How to install VMware Unlocker on VMware Workstation on Windows?
macOS is only supported by Intel-based processors, any other processor like AMD doesn’t support macOS. It is better to have an Intel-based computer using any Windows OS to perform virtualization.
We have installed VMware Unlocker on VMware Workstation player inside Windows 7. However, you can perform the same procedure on other Windows OS like Windows 8. 1 or Windows 10 as well. Here is how we have installed macOS Unlocker on VMware workstation player.
Since there are continuous updates by the application, we would like to ask the users to have a backup of your VMware applications. As, it is possible that you might lose your settings or file during the installation.
Important: Before you install the latest version of VMware Unlocker on your computer, you will need to remove the previous version of Unlocker first. Installing macOS Unlocker on VMware workstation already having earlier version can cause failure.
1. Download & Install VMware
First thing first, if you have not downloaded VMware or installed on your computer. Then do it first. Still, if you are confused about which version of VMware workstation to use then here is a quick intro.
VMware workstation has different versions. VMware Workstation Pro is a premium version and need to license which can be purchased. On the other VMware Player is a free version of VMware for students and other personal uses.
2. Download and Extract VMware Unlocker
As you have already downloaded the file, you will need to extract the file in your computer. For the extraction, you can use applications like WinRAR or 7zip. Extract the file in a known folder, so that you won’t lose it later.
Note: Before starting the installation, you will need to turn off your VMware workstation on your computer. You will need to open the taskbar and turn off all the VMware series, as active VMware during the installation can cause file damage.
3. Uninstall previous version

By any chance, if you have already installed a previous version of VMware Unlocker, then you will need it to be removed. You can remove the previous version of Unlocker by using the script present inside the folder.
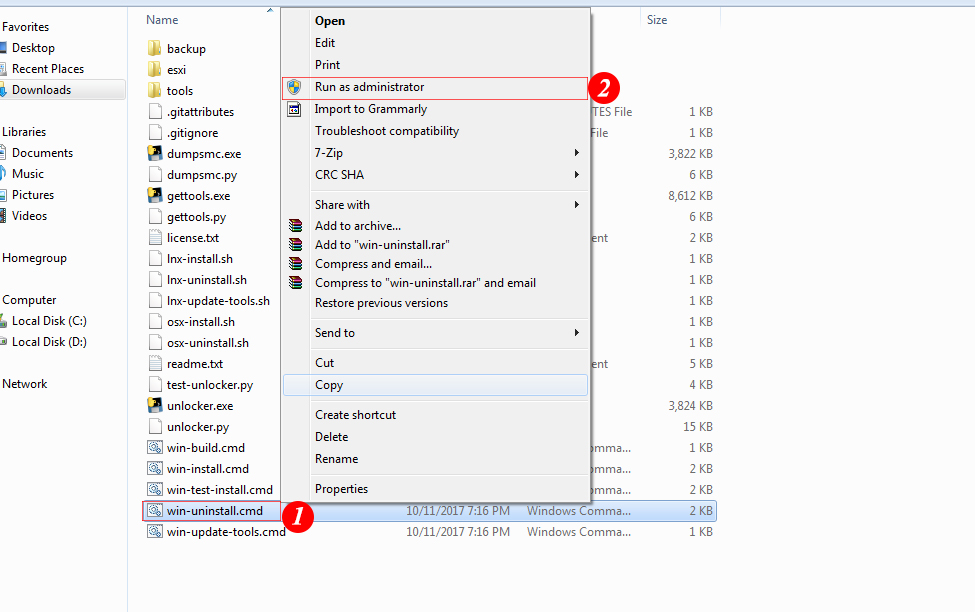
Open the file you have extracted earlier and inside the folder, you will find win-uninstall.cmd file. Now, right-click on the file and run it as Administrator. A CMD screen will appear and start to load. As soon as the uninstallation is completed, the CMD window will be closed automatically.
4. Install the Unlocker

Now is the time to install the application. Right-click on win-install.cmd file and run it as Administrator. A CMD window will appear and start to install it on your computer. Before it starts the installation, the application will download some files. The file varies in size, however most of the time it is around 602 MB.
The moment when CMD window is closed automatically will be the sign for you that you have successfully installed VMware Unlocker on VMware workstation player.
Download earlier versions of macOS Unlocker for VMware Workstation
You can download some earlier versions of macOS Unlocker. Remember that macOS unlocker, VMware unlocker, or VMware unlocker patch tool are the same thing. It is just the names different users use. Other then the name, there is absolutely no difference at all.

