
Use PowerShell to Install .MSI Files
When it comes to streamlining software deployment and management on Windows, leveraging PowerShell can be a powerful approach. PowerShell, a robust scripting and automation framework developed by Microsoft, provides a convenient way to install various software packages, including .MSI files.
These files, known as Microsoft Installer files, contain installation instructions for applications and are commonly used for software distribution. By employing the command “PowerShell install msi” along with appropriate parameters, you can effortlessly install .MSI files and efficiently handle software installation tasks across multiple machines.
Table of Contents
Install MSI with PowerShell
Installing an MSI file using PowerShell on Windows 11 is a straightforward process that involves utilizing the `Start-Process` cmdlet along with the `-ArgumentList` parameter. For installing an MSI file using PowerShell on Windows also involves using the exact keyword “PowerShell install msi” to ensure a smooth process. Here’s a step-by-step guide on how to achieve this:
1. Open PowerShell
To begin, press Win+X on your keyboard and select Windows Terminal (Admin) or Windows PowerShell (Admin).
This will launch PowerShell with the necessary administrative privileges.
2. Navigate to the MSI Location
Use the `cd` command to navigate to the directory where your MSI file is located. For example, if the MSI file is on your desktop, use the following command:
cd C:\Users\YourUsername\DesktopBe sure to replace `YourUsername` with your specific Windows username.
3. Install the MSI
Now, leverage the “PowerShell install msi” keyword by utilizing the “Start-Process” cmdlet to initiate the installation of the MSI file. Employ the following syntax:
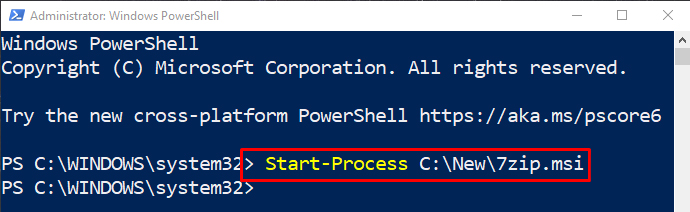
Start-Process -FilePath "msiexec.exe" -ArgumentList "/i 'Path\to\YourInstaller.msi' /qn"Replace “Path\to\YourInstaller.msi” with the actual path to your MSI file. The “/qn” parameter ensures a quiet installation, enabling the process to occur without any user interface.
Exercise patience as the installation may take a few moments to complete. PowerShell will return control to you once the installation finishes.
That’s it! You’ve successfully installed an MSI using PowerShell on Windows 11. Remember to replace placeholders like “YourUsername” and “Path\to\YourInstaller.msi” with your actual information.
As always, exercise caution when running scripts and commands with administrative privileges. Make sure you’re installing software from a trusted source and that you understand the implications of the installation process.
Install the msi package quietly using PowerShell
To install an MSI package quietly (silently) using PowerShell, you can use the following command:
First, you are going to run PowerShell with administrator privileges. Then you will use the command given on PowerShell:
Start-Process -FilePath "msiexec.exe" -ArgumentList "/i 'Path\to\YourInstaller.msi' /qn" -WaitReplace “’Path\to\YourInstaller.msi’” with the actual path to your MSI file. The “/I” flag indicates installation and the `/qn` flag specifies a quiet (silent) installation without any user interface.
The “-Wait” parameter is added to ensure that PowerShell waits for the installation to complete before proceeding. This is useful if you want to perform additional actions after the installation.
Here’s the complete command:
Start-Process -FilePath "msiexec.exe" -ArgumentList "/i 'C:\Path\to\YourInstaller.msi' /qn" -WaitRunning this command will install the MSI package quietly, without displaying any user interface or prompts. Just remember to replace “’C:\Path\to\YourInstaller.msi’” with the actual path to your MSI file.
MSI (Microsoft Installer) – Your Windows Software Solution!
MSI, or Microsoft Installer, is the go-to technology for hassle-free software installation on Windows. With MSI packages, installing applications becomes a breeze. Say goodbye to manual setups – MSI’s silent installations smoothly deploy software in the background, making life easier for administrators juggling multiple computers.
Customization is a snap too! Tailor installations using command-line tweaks and transforms (MST files). Uninstalling or updating? MSI has your back, ensuring clean removals and seamless maintenance.
While MSI boasts power, crafting custom packages can be a tad intricate. Fear not, though, as tools like Group Policy and System Center swoop in for easy network-wide deployment.
Trustworthy and essential, MSI has stood the test of time. Though alternatives like App-V and WiX exist, MSI remains a trusted ally for dependable software distribution on Windows systems.

