Fixed Generic PNP Monitor Driver Problem on Windows 10/11
Either you have recently brought a brand-new monitor or have updated your drivers; if you are having a Generic PNP Monitor driver problem in Device Manager on your Windows then here is how to fix it.
Table of Contents
What is a generic PnP monitor?
A generic PnP monitor is a plug-and-play display device that doesn’t require additional drivers. It is recognized by the system using standard protocols and configurations. While convenient, it may lack advanced features or optimizations found in branded monitors. Installing the correct driver can resolve compatibility issues and unlock additional features.
Related Topic: NVIDIA GeForce Experience Error Code 0x0001 Fixed
How to Fix the Generic PNP Monitor Driver Problem?

PnP means plug and play. Directly plug a PnP hardware, and it starts working without any installation. When you see a generic PnP monitor on the device manager, it means Windows was unable to recognize the device.
In such cases, you are compelled to install drivers on Windows. Without the driver, or with the wrong driver, this leads to monitor issues. Anyhow, here are the ways to fix Generic PNP Monitor Driver Problems.
Method 1: Reconnect Monitor
If you are experiencing issues with your monitor, one of the first troubleshooting steps is to reconnect the monitor to your computer. Follow these steps to reconnect your monitor:
1. Turn off your computer and monitor.
2. Disconnect the video cable (HDMI, DisplayPort, DVI, VGA, etc.) from both the computer and the monitor.
3. Inspect the video cable for any signs of damage or bent pins. If you find any issues, replace the cable.
4. Reconnect the video cable securely to both the computer and the monitor.
5. Turn on your monitor and then turn on your computer.
6. Wait for the computer to fully boot up and check if the monitor displays correctly.
NOTE: if you are using any sort of converter for your monitor like VGA to HDMI or VGA to display port, please check for any damage or loose connection.
Reconnecting the monitor can help resolve connectivity issues or loose connections that may be causing problems. If the issue persists, you can try other troubleshooting methods given.
Method 2: Update Generic PnP Monitor Driver
To update the generic PnP monitor driver on Windows, you can follow these steps:
1. Press the Windows+X on your keyboard and select Device Manager from the menu that appears.
2. In the Device Manager window, locate and expand the Monitors category.
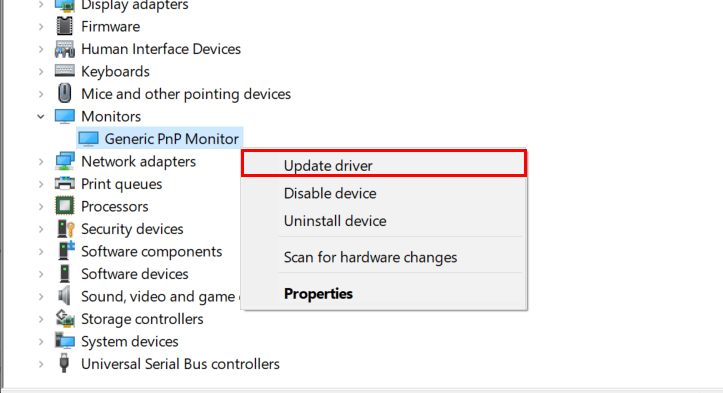
3. Right-click on the generic PnP monitor entry and select Update driver from the context menu.
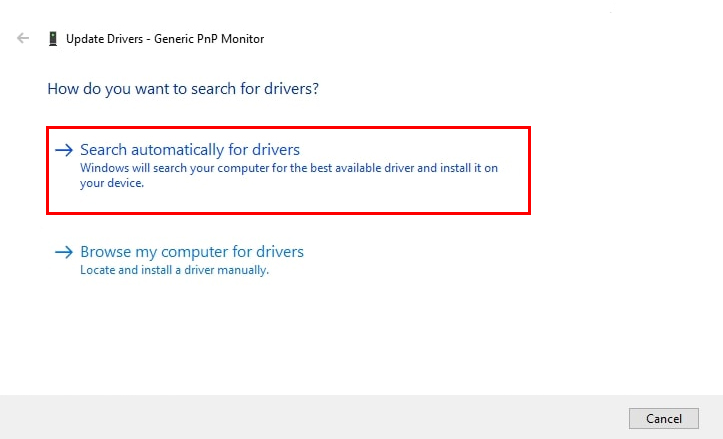
4. Choose the option to search automatically for updated driver software. Windows will then search for and install the latest driver available for your monitor. Wait for the driver update process to complete. If a newer driver is found and installed, it may require a system restart to take effect.
5. After the update and restart (if necessary), check if the monitor is functioning properly.
Updating the generic PnP monitor driver can help resolve compatibility issues and improve performance. However, keep in mind that since it is a generic driver, it may not provide all the advanced features specific to your monitor model. For optimal performance and access to specific features, consider installing the manufacturer-provided driver, if available.
Method 3: Update Display Card Driver
To update the display card driver on your computer, follow these steps:
1. Press the Windows+X on your keyboard and select Device Manager from the menu.
2. In the Device Manager window, find and expand the Display Adapters category.
3. Right-click on your display card (e.g., NVIDIA, AMD, Intel) and select Update driver from the context menu.
4. Choose the option to search automatically for updated driver software. Windows will search online for the latest driver version and install it. Wait for the driver update process to complete. If a newer driver is found and installed, you may be prompted to restart your computer for the changes to take effect.
5. After the update and restart (if necessary), check if your monitor is working properly.
Updating the display card driver can often resolve issues related to the generic PnP monitor, as the display card and its driver play a crucial role in communicating with the monitor. Ensure you have a stable internet connection during the driver update process to download the latest driver version.
Method 4: Uninstall Generic PnP Monitor Driver
Uninstalling the generic PnP monitor driver can sometimes help resolve issues with the monitor. Follow these steps to uninstall the driver:
1. Press the Windows+X on your keyboard and select Device Manager from the menu.
2. In the Device Manager window, expand the Monitors category.

3. Right-click on the generic PnP monitor entry and select Uninstall device from the context menu.
4. A confirmation dialog may appear. Check the box that says Delete the driver software for this device and click Uninstall to proceed. Wait for the driver uninstallation process to complete.
5. Restart your computer.
After restarting, Windows will attempt to reinstall the generic PnP monitor driver automatically. This process may take a few moments. Check if the monitor is functioning correctly. If the issue persists, you will need to apply the next method.
Method 5: Run the System File Checker
Running the System File Checker (SFC) utility can help identify and repair any corrupted system files that may be causing issues with the generic PnP monitor. Here’s how to use the SFC tool:
1. Press the Windows key on your keyboard and type “Command Prompt”.
2. Right-click on Command Prompt in the search results and select Run as administrator to open an elevated Command Prompt.
3. In the Command Prompt window, type the following command and press Enter:
sfc /scannow4. The System File Checker will scan your system for corrupted files and attempt to repair them. This process may take some time.
5. Once the scan and repair process is complete, restart your computer.
After the restart, check if the issues with the generic PnP monitor have been resolved. If not, you may need to explore other troubleshooting methods or seek further assistance.
Method 6: Disable the PnP monitor in Device Manager
Disabling the generic PnP monitor in the Device Manager can be a troubleshooting step to address certain issues. Here’s how you can disable the monitor:
1. Press the Windows+X on your keyboard and select Device Manager from the menu.
2. In the Device Manager window, locate and expand the Monitors category.
3. Right-click on the generic PnP monitor entry and select Disable device from the context menu.
4. A warning prompt may appear, informing you that disabling the device may cause it to stop working. Confirm the action by clicking Yes or OK.
By disabling the generic PnP monitor, your computer will treat it as if it is disconnected. This can be useful in troubleshooting scenarios where you suspect the monitor may be causing issues.
To re-enable the monitor, follow the same steps and select Enable device instead of Disable device in the Device Manager.
Method 7: Check for Windows Updates
Checking for and installing Windows updates can help resolve issues related to the generic PnP monitor. Here’s how you can do it:
1. Press the Windows key on your keyboard and open the Windows Settings in the Start menu.
2. In the Windows Settings window, click on Update & Security.
3. In the Update & Security settings, select Windows Update from the left-hand menu.
4. Click on the Check for updates button. Windows will then search for available updates.
5. If there are any updates available, click on Download and Install to begin the update process.
Wait for Windows to download and install the updates. This process may take some time, and your computer may restart during the installation.
Once the updates are installed, check if the issues with the generic PnP monitor have been resolved.
Windows updates often include bug fixes, driver updates, and security patches that can address compatibility issues and improve the overall system performance. It’s important to keep your operating system up to date to ensure optimal functionality.
What is the difference between generic PnP and non-generic PnP drivers?
A generic PnP monitor is recognized by the system without specific drivers. It has basic functionality but lacks advanced features. Non-generic PnP drivers are provided by the monitor manufacturer. They offer enhanced functionality, optimizations, and specific features.
Installing non-generic PnP drivers improves the user experience. The generic PnP driver is a default option for basic functionality. Non-generic drivers unlock the monitor’s full potential. Installing manufacturer-provided drivers is recommended for optimal performance.
Installing manufacturer-provided drivers ensures compatibility with specialized software and unlocks advanced settings tailored to the specific monitor model. It allows users to fully leverage the capabilities of their non-generic PnP monitor for a more customized and optimized display experience.
Related Topic: How to Turn a Windows Laptop into a Desktop PC