Antimalware Service Executable High Memory Usage on Windows 10/11
High memory usage by the Antimalware Service Executable process on Windows 10/11 has been a concern for users seeking an optimal balance between system security and performance.
This article delves into the causes behind this issue and offers practical solutions to alleviate memory-intensive behavior. By understanding and addressing this challenge, users can ensure a smoother computing experience while maintaining robust protection against malware threats.
Table of Contents
What is Antimalware Service Executable? And causes the High Memory Usage?
“Antimalware Service Executable” is a process running on the Windows operating system that is associated with Windows Defender, the built-in antivirus, and antimalware software provided by Microsoft.
This process, also known as MsMpEng.exe, is responsible for real-time scanning, monitoring, and protection against various types of malware, such as viruses, spyware, and other malicious software.
Sometimes, users may notice that the Antimalware Service Executable process consumes a high amount of memory or CPU resources. This high memory or CPU usage can occur due to several reasons:
1. Scheduled scanning: Windows Defender regularly scans your computer for potential threats. During a scheduled scan, the Antimalware Service Executable process may consume significant system resources, leading to high memory usage.
2. Real-time protection: The Antimalware Service Executable continuously monitors your system for any suspicious activity or malware. In certain cases, if it encounters a heavily infected file or encounters complex malware, it may utilize more system resources to handle the threat.
3. Conflict with other security software: If you have multiple antivirus or antimalware programs installed on your computer, they may conflict with each other and result in high memory usage by the Antimalware Service Executable.
4. Large number of files: If you have a large number of files or directories on your computer, Windows Defender may take longer to scan all the files, which can lead to higher memory usage.
How to Fix Antimalware Service Executable High Memory Usage?

To fix the issue of Antimalware Service Executable’s high memory usage on Windows 10/11, you can try the following solutions:
Method 1. Adjust Windows Defender’s scheduled scanning:
Windows Defender performs regular scans on your system to ensure ongoing protection. However, these scheduled scans can contribute to high memory usage by the Antimalware Service Executable. By adjusting the scanning settings, you can minimize the impact on system resources. Here’s how:
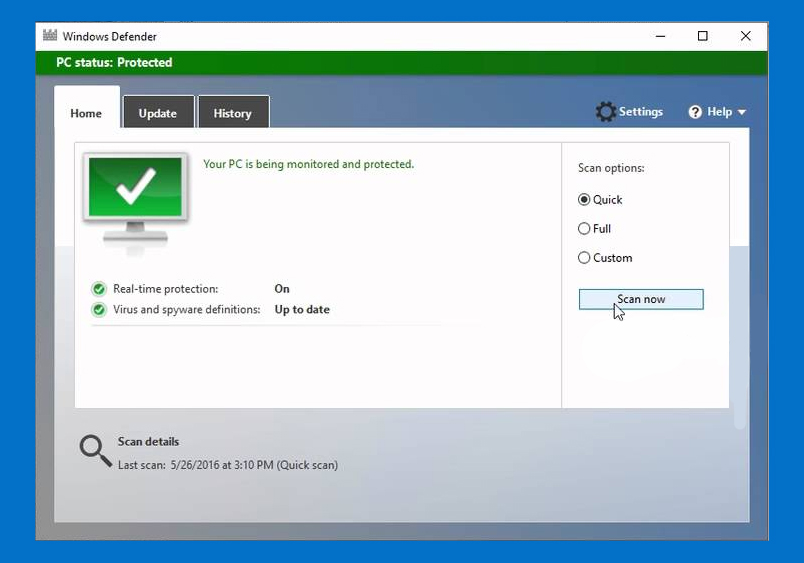
- Open Windows Security and navigate to Virus & threat protection.
- Access the Manage settings link under the Quick Scan section.
- Disable the Quick scan and Full scan options under Automatic scanning if you prefer manual scans. Alternatively, choose a time when your computer is typically idle for the scheduled scans.
Once the scanning got completed then you might find the high memory usage fixed. If not then you are recommended to use the next method.
Method 2. Exclude files or folders from scanning:
Windows Defender scans all files and folders on your system, which can lead to increased memory usage. However, you may have specific files or directories that you trust and don’t need to be scanned regularly. By excluding them from Windows Defender’s scanning process, you can reduce the workload on Antimalware Service Executable. Here’s how:
- Open Windows Security and select Virus & threat protection.
- Click on the Manage Settings link under the Quick Scan section.
- Scroll down to the Exclusions section and click on Add or remove exclusions.
- Choose the type of exclusion (file, folder, file type, or process) and add the specific items you want to exclude from scanning.
Method 3. Optimize Windows Defender’s real-time protection:
Windows Defender’s real-time protection continuously monitors your system for any suspicious activity or malware. However, in some cases, it can contribute to high memory usage. By temporarily disabling real-time protection, you can assess its impact on memory usage. Here’s how:
- Open Windows Security and go to Virus & threat protection.
- Click on Manage Settings under the Virus & threat protection settings section.
- Temporarily toggle off the Real-time protection option to see if it alleviates the memory usage issue. Remember to enable it later to maintain your system’s security.
Note: It’s important to re-enable real-time protection and periodically run manual scans to ensure your system remains protected against malware threats. It’s worth noting that while high memory or CPU usage by the Antimalware Service Executable can be noticeable, it is generally a sign that your system is being actively protected against malware threats.
Method 4. Disable Windows Defender in Registry
When your Windows Defender got corrupted due to continuous file scanning, the Antimalware Service Executable high CPU issue might be fixed by disabling Windows Defender.
- Press Windows+R to open the Run Dialog Box.
- In the Run Dialog Box, type regedit and click OK to open the Registry Editor.
- In the navigation pane on the left, double-click the folders to navigate to:
HKEY_LOCAL_MACHINE\SOFTWARE\Policies\Microsoft\Windows Defender.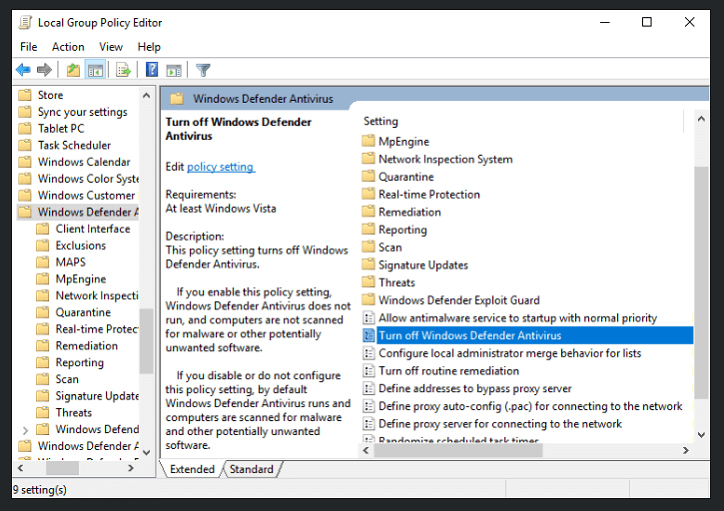
- If you find a registry entry named “DisableAntiSpyware”, double-click it and set its value data to 1.
Note: If you do not see a registry entry named DisableAntiSpyware, you can create it by following these user-friendly steps:
- Right-click in the main Registry Editor pane and select New > DWORD (32-bit) Value.
- Name this new registry entry “DisableAntiSpyware“.
- Double-click the newly created entry and set its value data to 1.
Please note that modifying the Windows Registry should be done with caution, and it is advisable to create a backup or seek assistance if you are unfamiliar with the process.