All About Group Policy Management Editor on Windows 10

Group Policy Management Editor (GPME) is a Microsoft Windows administrative tool used to manage Group Policy Objects (GPOs) within an Active Directory (AD) environment. It provides a graphical user interface (GUI) that allows system administrators to create, edit, and manage GPOs effectively.
Group Policy is a feature in Windows operating systems that allows administrators to centrally manage and configure computer and user settings. It helps enforce security policies, manage software installations, configure network settings, and customize the user environment across a network of computers.
The Group Policy Management Editor is a component of the Group Policy Management Console (GPMC), which provides a comprehensive set of tools for managing GPOs. It allows administrators to create and modify GPOs, set policy settings, deploy software packages, and control various aspects of the Windows operating system and application behavior.
With the GPME, administrators can easily navigate through the different policy settings organized in a hierarchical structure, known as the Group Policy Object Editor. They can define policies at the domain, organizational unit (OU), or individual computer/user level. The GPME also provides options for configuring security settings, auditing, scripting, and administrative templates.
In summary, the Group Policy Management Editor is a tool that enables administrators to efficiently manage and control the configuration and behavior of computers and users within an Active Directory domain.
Table of Contents
How to access the group policy management editor on Windows 10?
To access the Group Policy Management Editor (GPME) in Windows 10, you need to follow these steps:
1. Open the Run dialog box by pressing the Windows+R on your keyboard.
2. Type “gpedit.msc” in the Run dialog box and press Enter or click OK.
This will launch the Group Policy Management Editor and give you access to manage and configure Group Policy settings on your Windows 10.
Please note that the Group Policy Management Editor is not available in all editions of Windows 10. It is typically included in the Professional, Enterprise, and Education editions. If you’re using Windows 10 Home Edition, the GPME is not available by default.
How to install a group policy management editor on Windows?
To install the Group Policy Management Editor (GPME) on Windows, you need to follow these steps:
1. Open the Run dialog box by pressing the Windows+R on your keyboard.
2. Type “appwiz.cpl” in the Run dialog box and press Enter or click OK. This will open the Programs and Features window.
3. In the Programs and Features window, click on Turn Windows features on or off on the left-hand side.
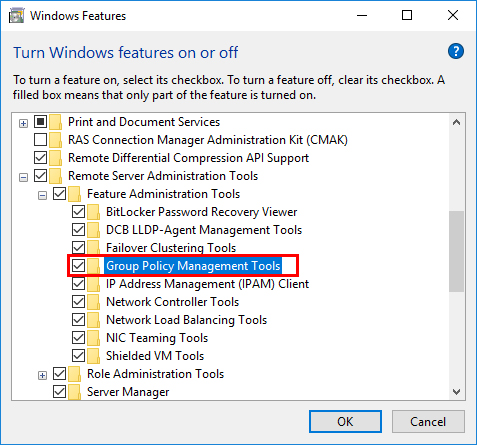
4. The Windows Features dialog box will appear. Scroll down and locate Group Policy Management or Group Policy Management Tools. Check the box next to it to enable the feature.
5. Click OK to save the changes. Windows will then install the necessary files and components for the Group Policy Management Editor.
Launch the Group Policy Management Editor, and start managing and configuring Group Policy settings on your Windows.
Please note that Group Policy Management Editor is included in the Professional, Enterprise, and Education editions, but not in the Home edition.
How to manage the Group Policy on Windows 10?
To manage Group Policy on Windows 10, you can follow these steps:
1. Open the Group Policy Management Editor (GPME):
- Press the Windows+R on your keyboard to open the Run dialog box.
- Type “gpedit.msc” and press Enter or click OK.
- The Group Policy Management Editor will open.
2. Navigate to the desired policy category:
In the Group Policy Management Editor, you’ll see a hierarchical structure on the left-hand side. Expand the folders to locate the desired policy category. For example, you can find policies related to computer settings under Computer Configuration and user settings under User Configuration.
3. Edit a policy:
- Double-click on a policy to edit its settings. A policy dialog box will appear.
- Modify the settings as needed. The available options will depend on the selected policy.
- Click OK to save the changes.
4. Create a new policy:
- Right-click on the desired policy category folder (e.g., “Computer Configuration” or “User Configuration”).
- Select New Policy to create a new policy.
- Give the policy a name and configure its settings in the policy dialog box.
- Click OK to save the new policy.
5. Apply policies to specific targets:
- Policies can be applied at different levels, such as domain, organizational unit (OU), or individual computer/user.
- To apply policies to a specific target, right-click on the target (e.g., domain, OU, or computer/user) in the Group Policy Management Editor.
- Select Create a GPO in this domain, and Link it here or a similar option.
- Choose the policy you want to apply from the list and click OK.
6. Update Group Policy settings:
- By default, Group Policy updates occur periodically on Windows 10. However, you can manually force an update by running the command “gpupdate” in an elevated Command Prompt.
- To open an elevated Command Prompt, right-click on the Start button, and select Command Prompt (Admin) or Windows PowerShell (Admin).
- Type “gpupdate” and press Enter. The Group Policy settings will be refreshed on the local machine.
It’s important to note that managing Group Policy can have a significant impact on system behavior and settings. Therefore, it is recommended to have a good understanding of the policies and their potential effects before making changes.

