How To Perform macOS Screen Sharing Over The Internet?
If you are trying to fix your friend’s computer then it can get quite a hard task to direct him by calls. Instead, you can use the macOS Screen Sharing or Remote Management over the internet and do all the troubleshooting yourself without leaving your comfort zone.
This is quite a handful of features as you can collaborate with your colleagues on different projects, you can remotely help customers and even manage the admin setup.
macOS Screen Sharing is not limited to only macOS Catalina or macOS Mojave. But older versions like Sierra and High Sierra, Yosemite, El Capitan also supports the feature.
Sharing services allows you to control to install or uninstall an application, relinquish control, update or restart the system. Whereas, features like duplicating screens are also available. And if you know about the other person’s Apple ID, then you can directly connect with him through Screen Sharing application. However, third-party applications like TeamViewer are also available for both Windows and macOS to perform the same task. But we won’t recommend any third-party app, as it will take extra storage in addition to other whole installations.
Table of Contents
How to use macOS Screen Sharing over the internet?

The macOS Screen Sharing app is a preinstalled application that doesn’t require any specific installation. This is an ideal application, as you can take full control of the call with great connectivity to other Mac computers. Due to its straight forward interface and easy navigation, it is loved by many.
Step 1: Open System Preferences Then Sharing Folder
The first step to perform the procedure will be by choosing Apple Menu > System Preferences. There you will need to open the Sharing folder.
Step 2: Write down the details

Remember when you are inside the Sharing folder you will see Computer Name, which can be edited to anything you want.
Now, note down you systems name (e.g., You-MacBook. Local) and also copy the IP address (e.g., vnc://10.0.0.14) provided next to Screen Sharing. Remember that this task as it will come handy in further steps.
There is also Computer Settings, that can enable both settings and enables to set secure password as well.
Step 3: Select checkboxes

Inside the sharing folder, you will see a number of checkboxes for options on the left side of the window like Screen Sharing, File Sharing, Printer Sharing, Remote Login, Remote Management, and many more. Select Screen and File sharing, you can choose all the options you want. Allowing more options will enable the user to have more access to your system.
If by any chance, you got Screen Sharing option OFF. Then I would like to recommend you to click on the Screen Sharing option checkbox once again. Remember that both Remote Management and Screen Sharing can’t work together at the same time.
Select the users you want to connect your mac with. Hereby checking boxes, you will allow the user to have access to your Mac.
Step 4: Connect the devices
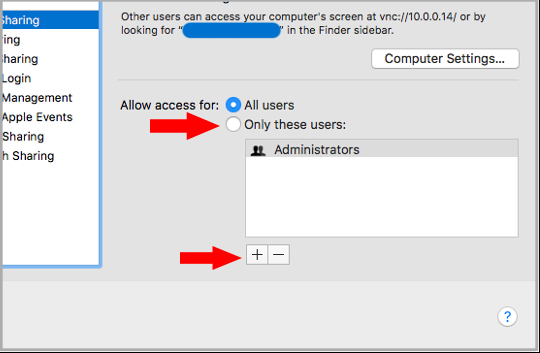
Now, go to radio buttons below the Screen Sharing. Select the Only these users’ option and click on + sign. A new tab will open, and soon all the Mac devices around you will be shown.
- There are All users: where any computer users can share your screen. If your mac is connected to a network server then anyone within that server can use your screen by using their network user name and password
- Only these users: it strictly specifies screen sharing for specific users
You can choose the option just to observe, use any applications, change setting or control your entire system. It only depends on your choices and range of authority you are providing him. Select the check boxes and press on Ok button.
Step 5: Run macOS Screen Sharing app

Now, on your other computer open the macOS Screen Sharing application. Then type the IP address of this Mac. Next insert the Mac name and password shown in the first steps and continue.
With every new version of macOS, a brand-new feature is released. Screen Sharing is not a new feature in macOS; however, it is well improved. The performance, user interface, and easy user experience.
It can save tons of time and space, for the technical users who are always troubleshooting other users systems. It is not just limited to only troubleshooting, screen sharing, or file transfer but other works like remotely rebooting, control Wi-Fi router through mac, and many more. Using these features, users can perform tasks that unimaginable.