
How to Enable Virtualization on Windows 10?
Want to enable virtualization on Windows 10? Well, use the method below to enable virtualization on any Windows OS that you desire. Bear with us till the end to enable virtualization on your system.
Enabling the feature will give you improved performance to run applications with better FPS and higher graphic support. The feature also improves BlueStacks performance with few errors.
You can also use Hyper-V by enabling the feature. Hyper-V is virtualization software that is used to create virtual machines for your systems. Having virtual machines enables you to create a sandbox-like environment to check different operating systems and applications.
Related Topic: How to install or enable hyper v on windows 10?
Table of Contents
Hardware Requirement for Virtualization

For enabling the feature, you will need the following specs:
You will need Windows 10 Professional or Enterprise. 64-bit processors with SLAT (seconds level address translation) are also required. For Memory, 4GB is enough. There is also the requirement for BIOS-Level Hardware Virtualization Support.
Check if virtualization is enabled
Before you start performing the operation, let’s make sure you haven’t already enabled the feature. To check whether virtualization is enabled on your Windows 10 or not. Two different ways are possible to check the feature is enabled or not.
- Use CMD to check virtualization
- Task Manager for checking virtualization
1- CMD for Virtualization
Go to the Start menu and type “cmd”. Right-click on CMD and run as administrator. Inside the CMD, you will type “systeminfo.exe”. this command will provide all the information about your system on your screen.
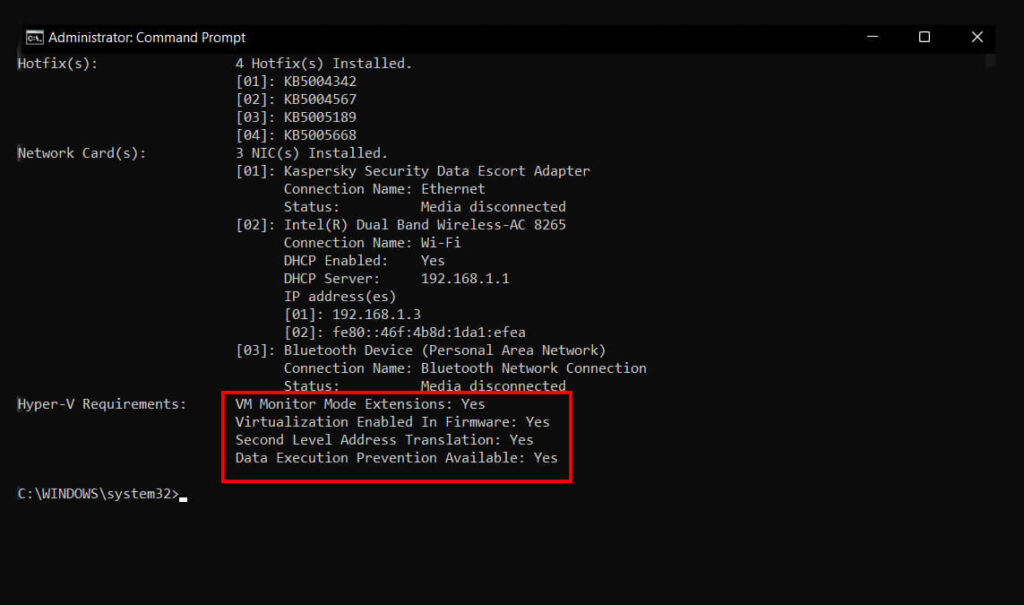
Scroll down at the bottom and you will find:
- VM Monitor Mode Extensions: YES
- Virtualization Enabled In Firmware: YES
- Second Level Address Translation: YES
- Data Execution Prevention Available: YES
If all of them are Yes, then your virtualization feature is already enabled.
2- Task Manager for virtualization
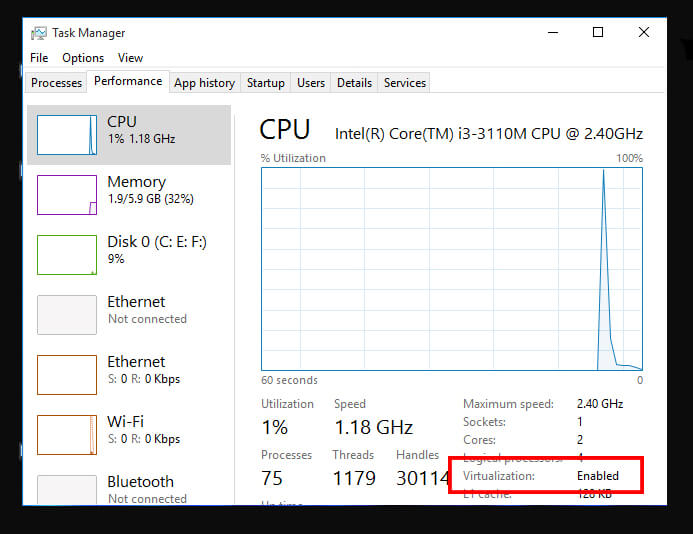
This is a simple way to check virtualization. Use CTRL+ALT+ESC on both Windows 10 and Windows 11 to start the Task Manager.
Inside the Task Manager, open the Performance. Then at the bottom, you will find Virtualization: ON or Virtualization: OFF.
Related Topic: How to install or enable hyper v on windows 10?
How to Enable Virtualization on Windows?
For enabling virtualization, you will need to have access to BIOS first. Then you will enable the program inside Windows 10. For accessing BIOS, there are two different ways.
BIOS from Windows 10
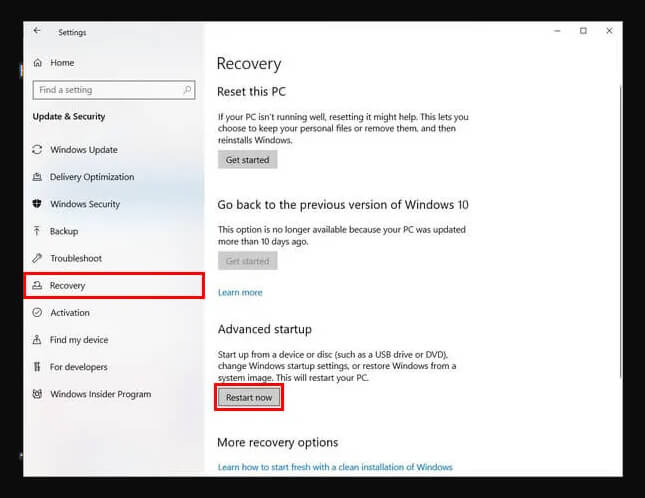
First, you will open Settings from the Start menu. Then you will select Update & Security > Recovery. Inside the Recovery, you will select the Advanced Startup option and will click on Restart now in the next window. Settings > Update & Security > Recovery > Advanced startup > Restart now.
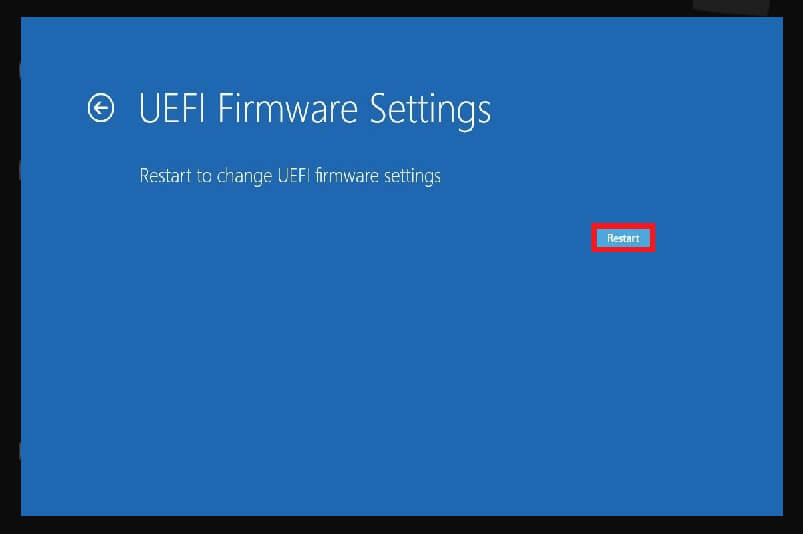
Now you will select Troubleshoot > Advanced Options > UEFI Firmware Settings > Restart.
NOTE: for some systems, you won’t find the UEFI Firmware option. Instead, you will need to select
Fast startup option to access the BIOS.
Other method
This is the simplest method ever. You will restart your system and while your system boots, you will press the F12 key to enter the BIOS. The different system requires different keys to enter the BIOS.
Keys like F1, F2, F3, F10, F12, Esc, and Delete can be used to enter the BIOS.
Inside the BIOS, you will go to Configuration, and there you will find Intel Virtual Technology. Enable the feature, save changes and exit the BIOS.
Note: For some users, they will find Advanced > Advanced Mode, there they will find the Virtualization feature.
Enable virtualization on different machines
Acer: Enter BIOS and go to System Configuration > Virtualization Technology. Enable the feature and press F10 to save changes and exit.
Asus: For Asus machines, enter the BIOS and go to Advanced > Virtualization Technology, enable the feature. Press F10 and Yes to save and exit.
DELL: go to Advanced > Virtualization, enable it and press F10; Yes to save and exit.
HP: in the BIOS you will find System Configuration > Virtualization Technology. Press Enter on your keyboard and enable it; press F10 to save and exit.
Lenovo: enter the BIOS and go to Security > Virtualization. Select the Intel® Virtualization Technology and press Enter key. Here you will enable the feature then press F10 to save and exit.
Enable the Virtualization in Windows 10

Now you will go to the Start menu and type “turnwindowsfeaturesonoroff”. Open the Turn Windows Features ON or OFF, navigate and find Hyper-V.
Check the box beside and expand the Hyper-V for further subfolders. Make sure they are selected too and click on the Apply/OK button.
Note: Inside Windows 11 systems, you will also find Virtual Machines, enable them too.
A popup window of “Windows completed the requested changes” and click on the Restart now button.
Related Topic: How to Enable Secure Boot and TPM for Windows 11?

